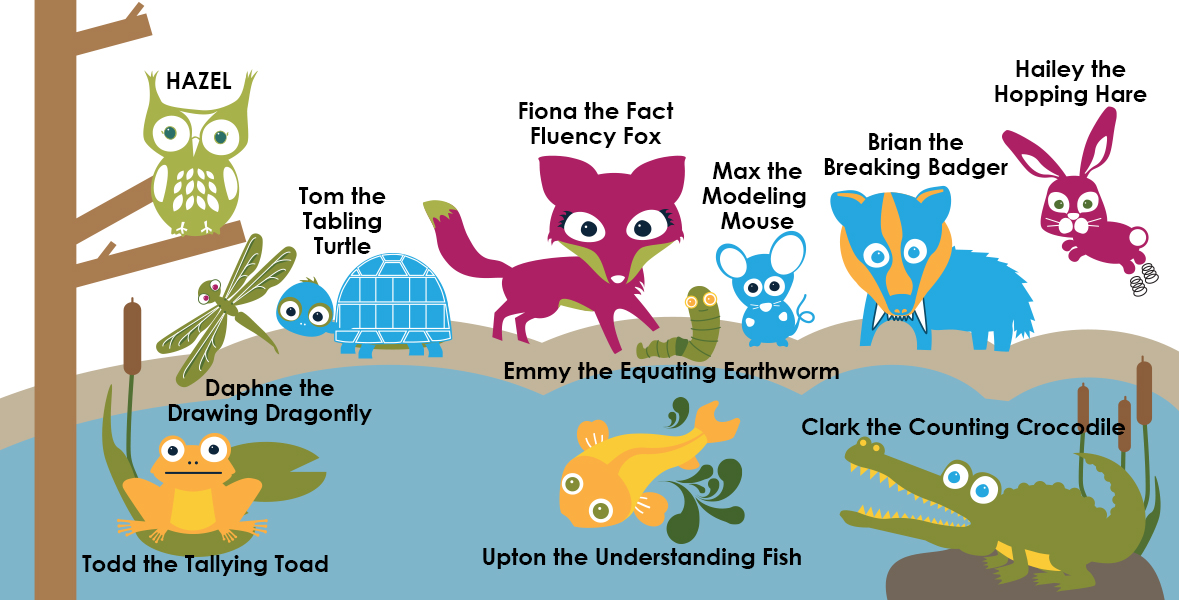
Say Hello to Hailey Hopping Hare

I’m Hailey the Hopping Hare, I’m the skip-counting master.
This is a skill that helps to count things faster;
Learn to count up or down by a number other than one.
Quick like a bunny, you soon will be done.
Keep in mind that skip counting is repeated addition.
Moving swiftly through problems is my main mission.

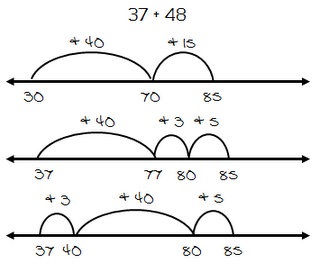
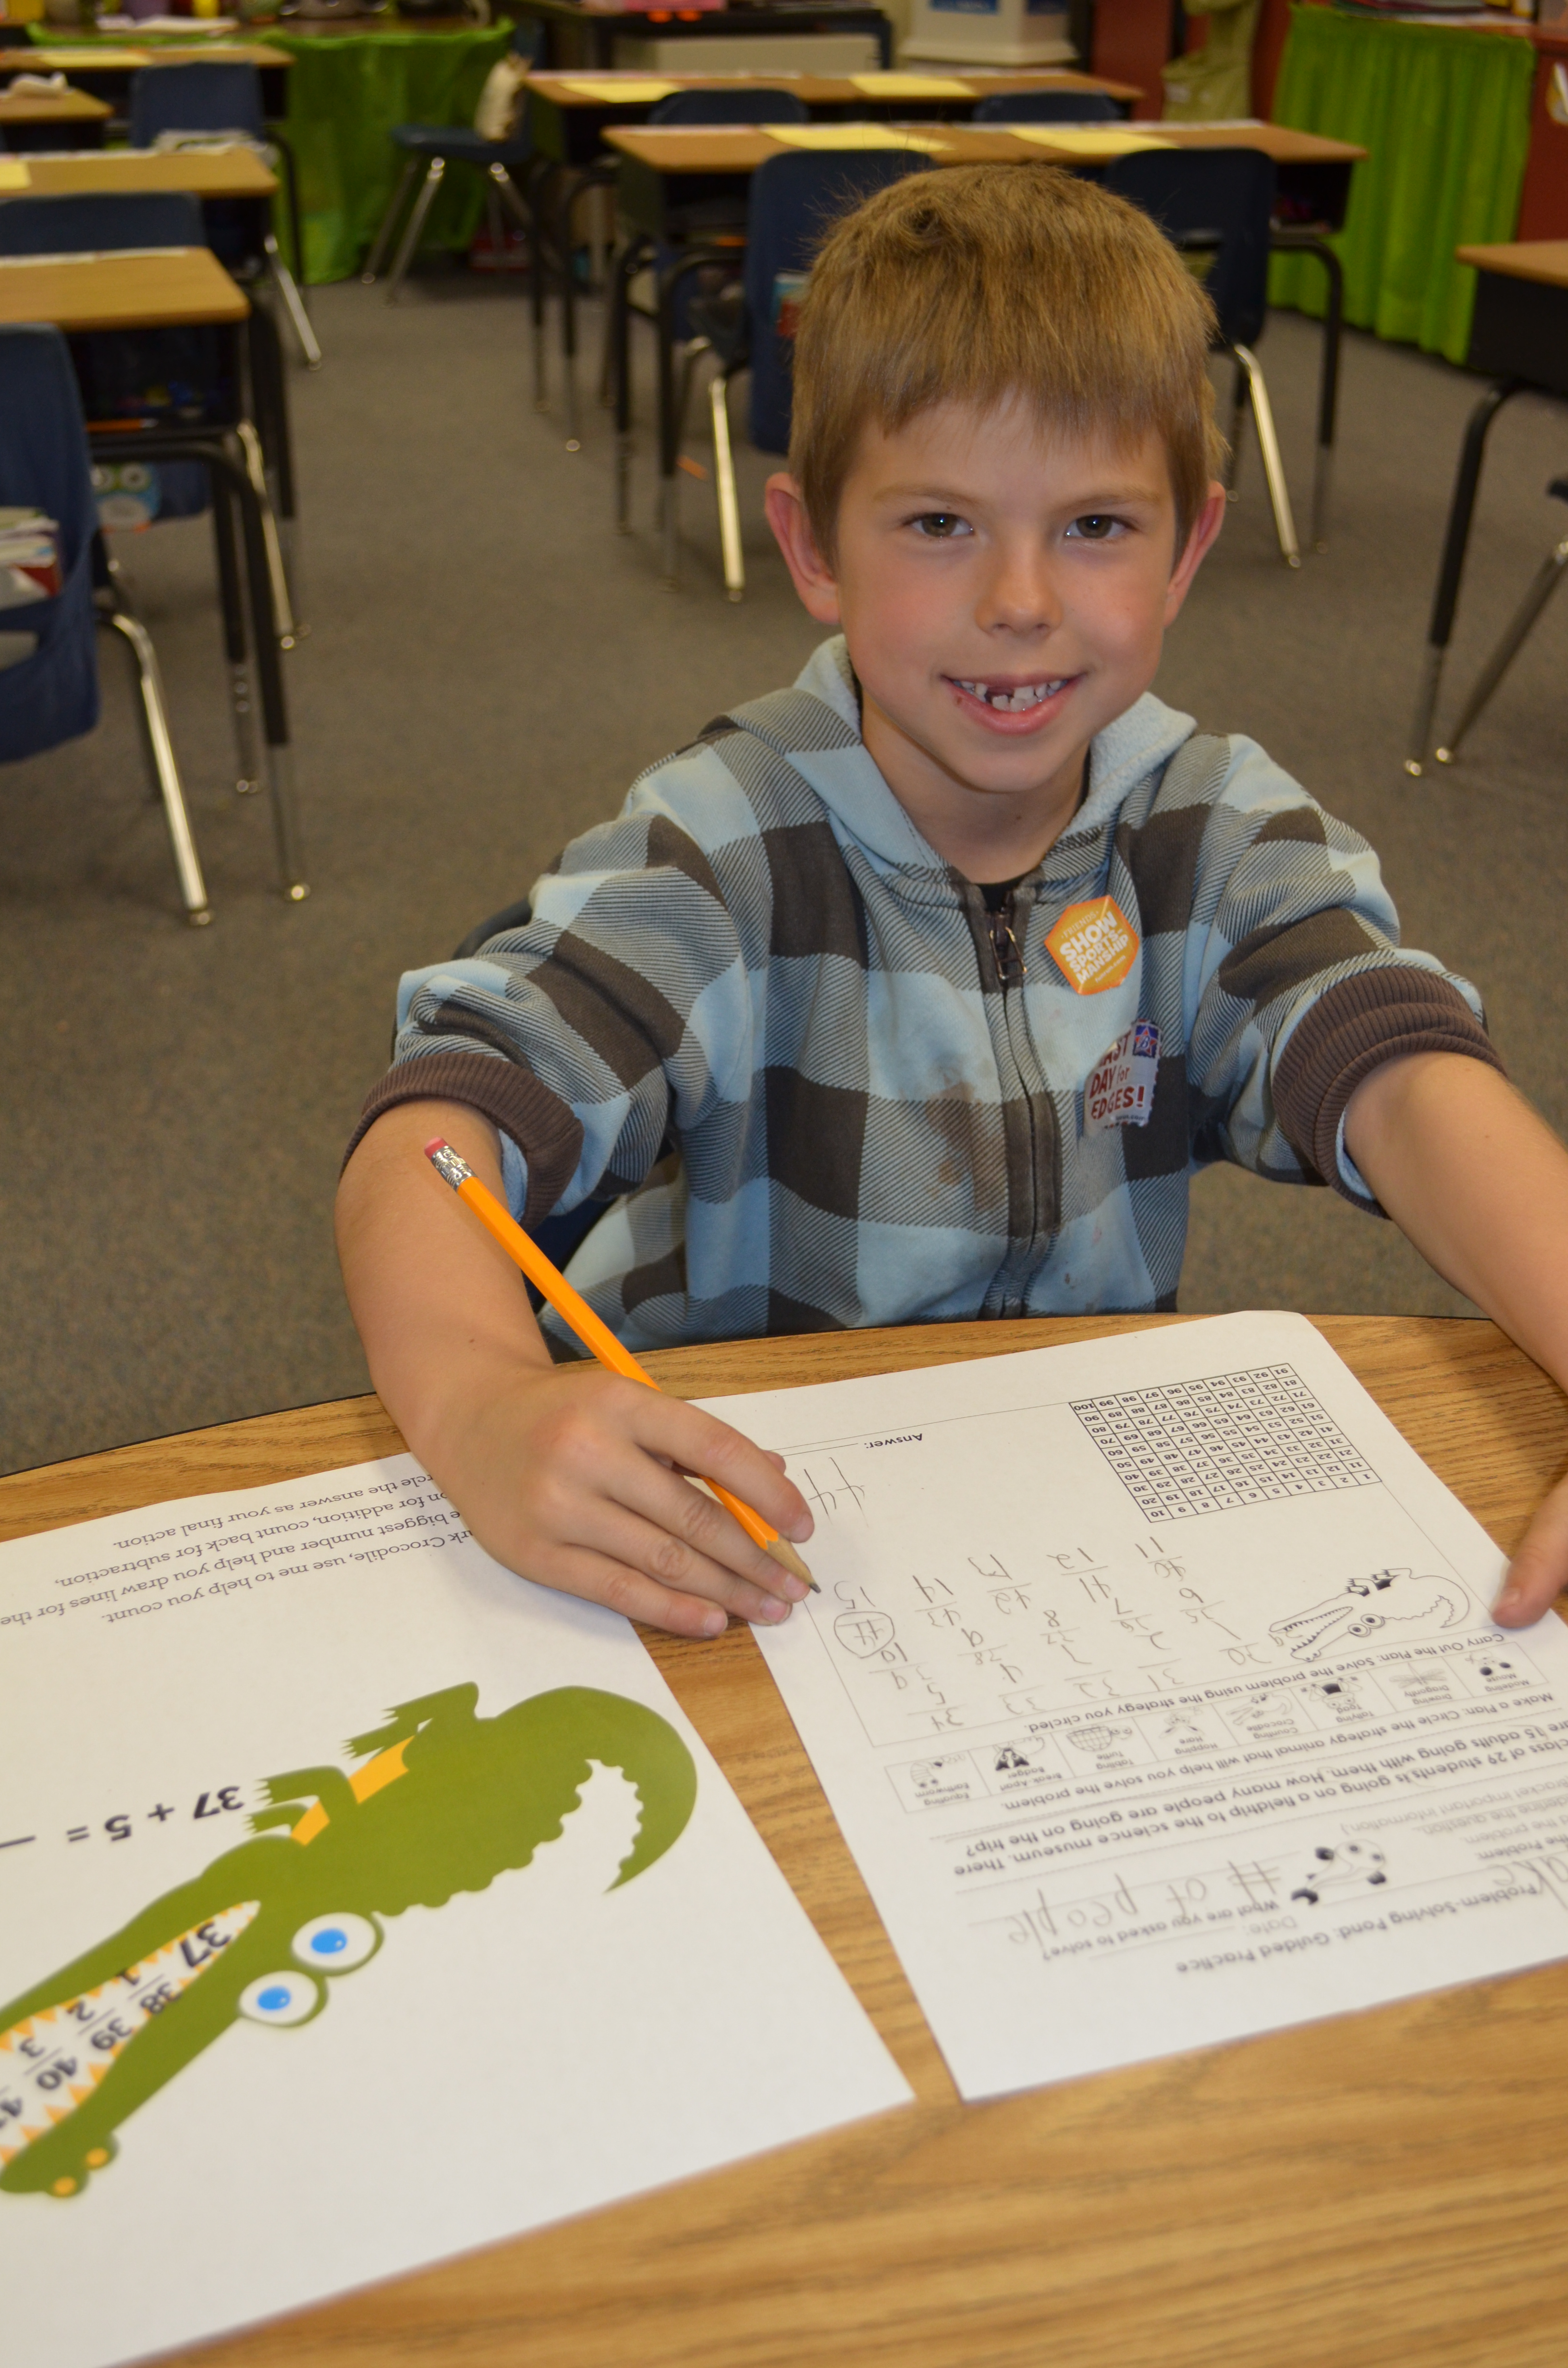
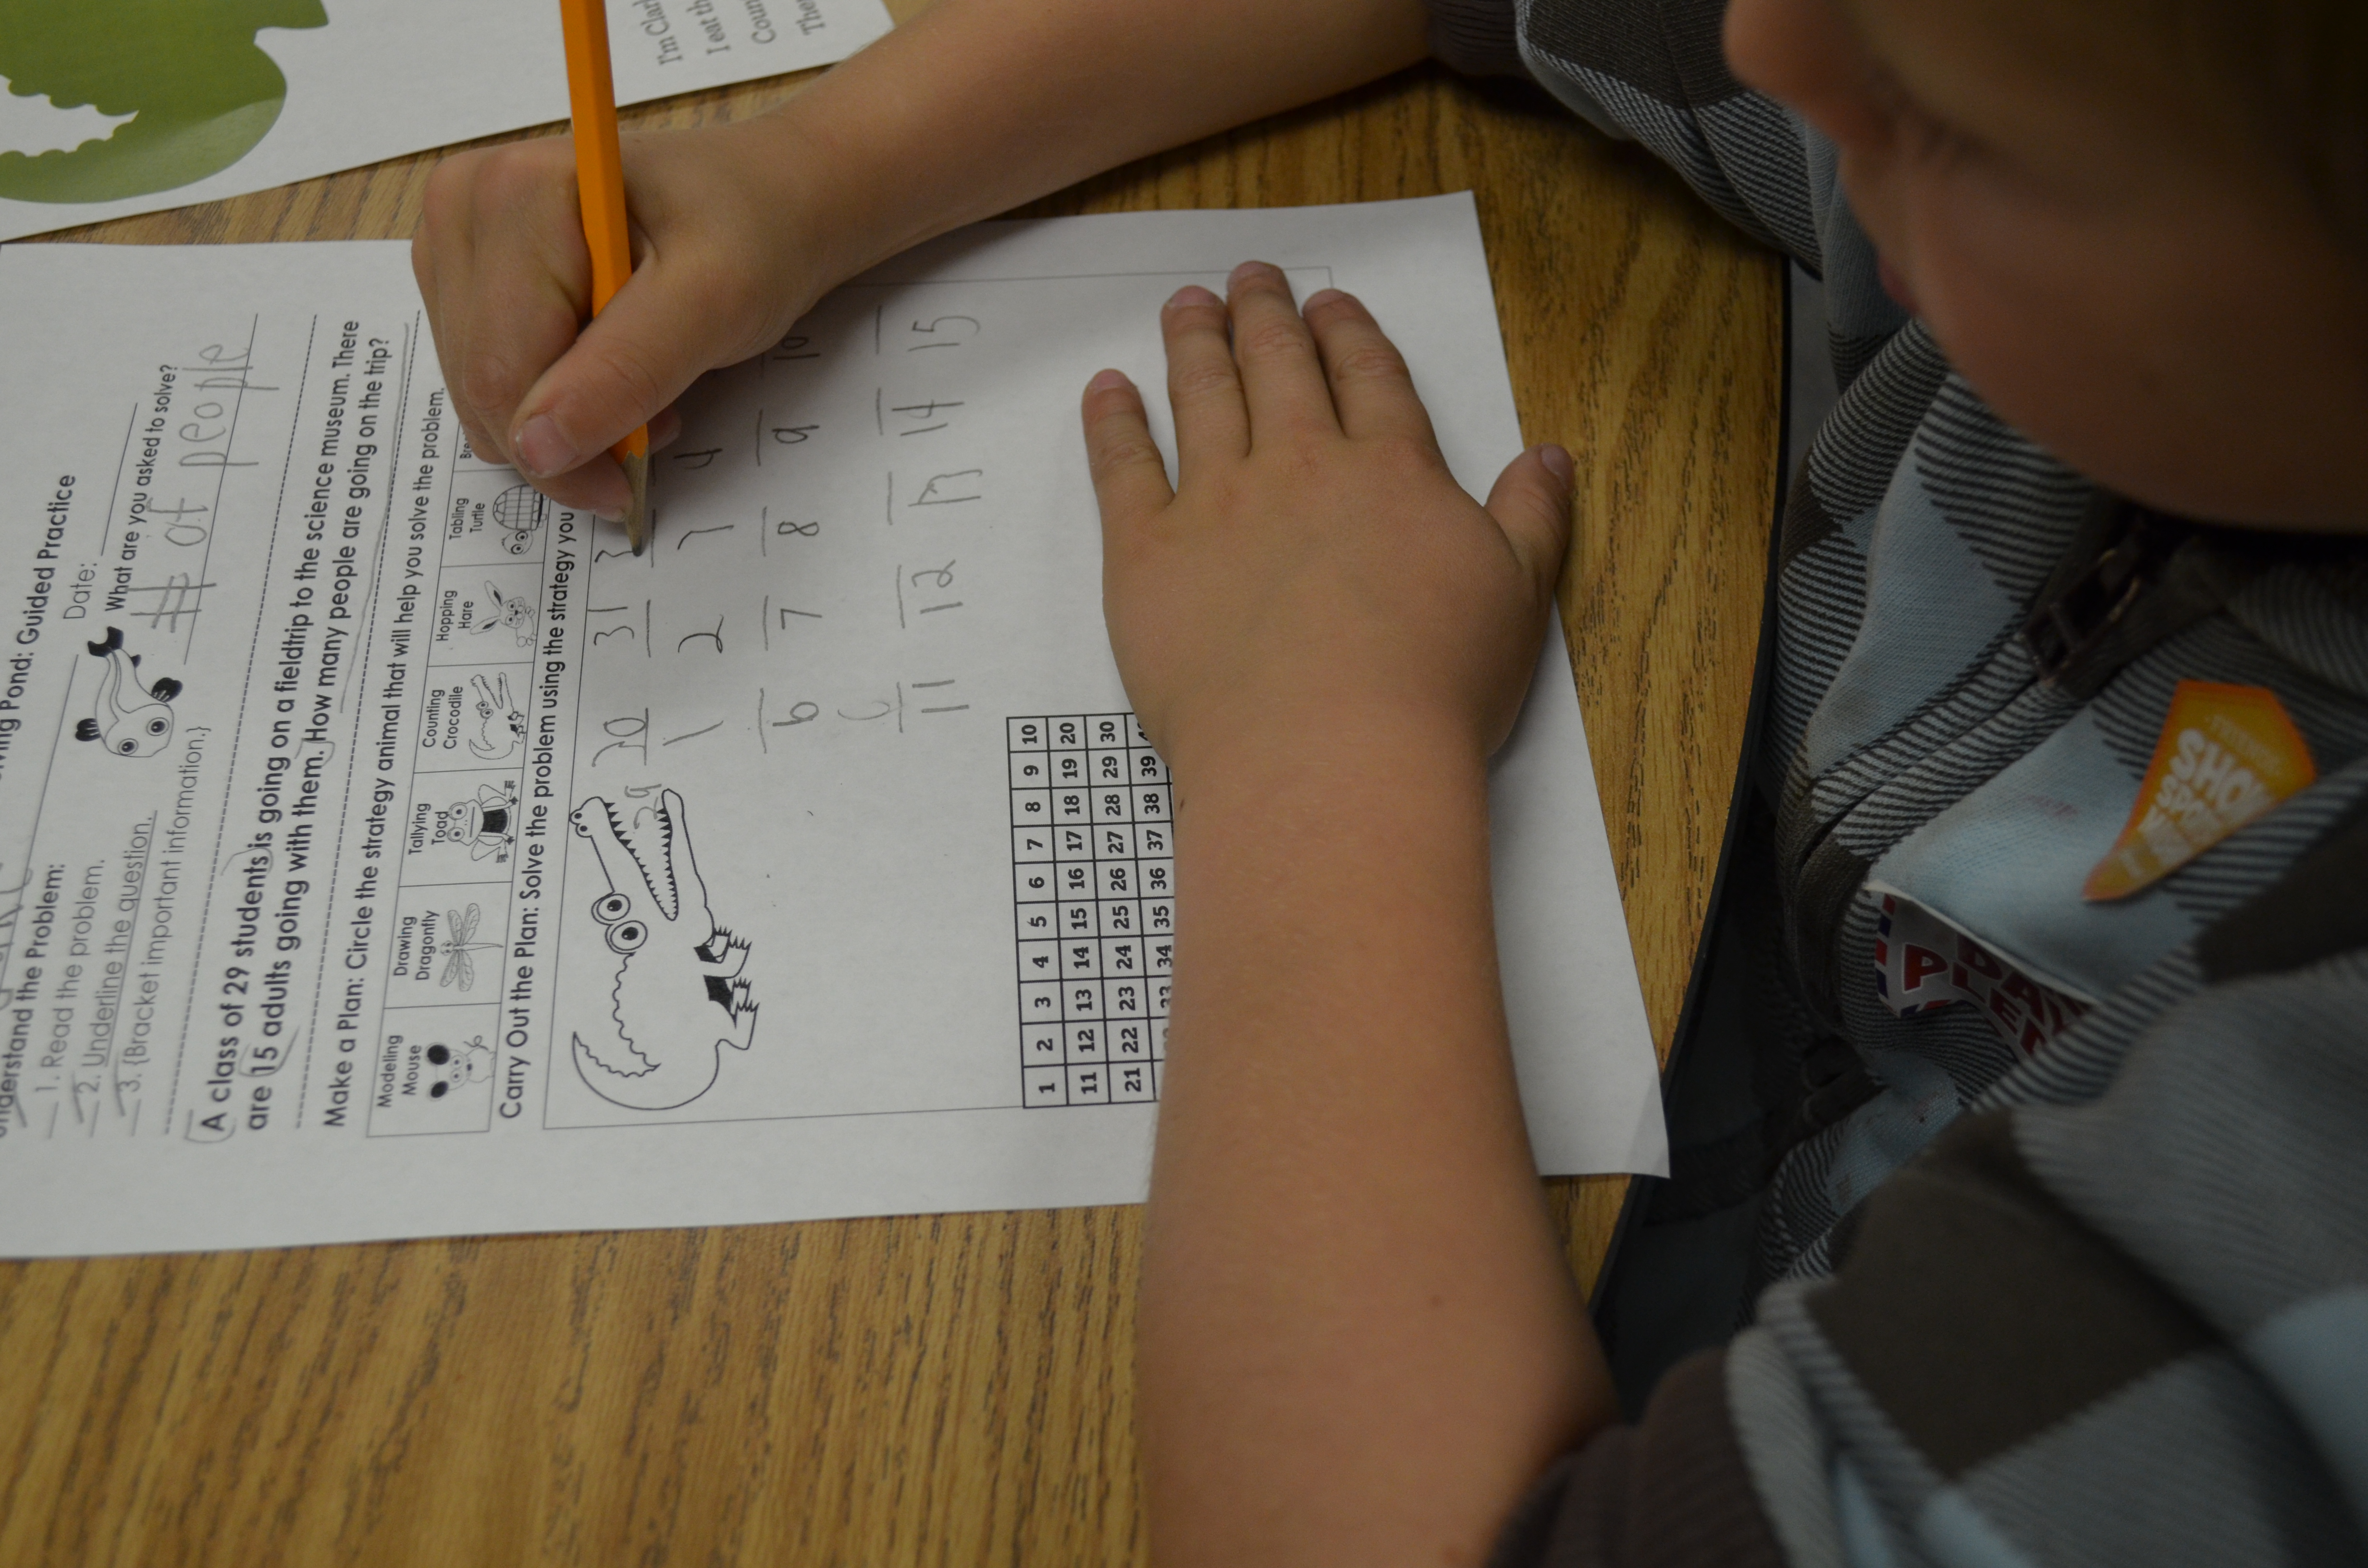
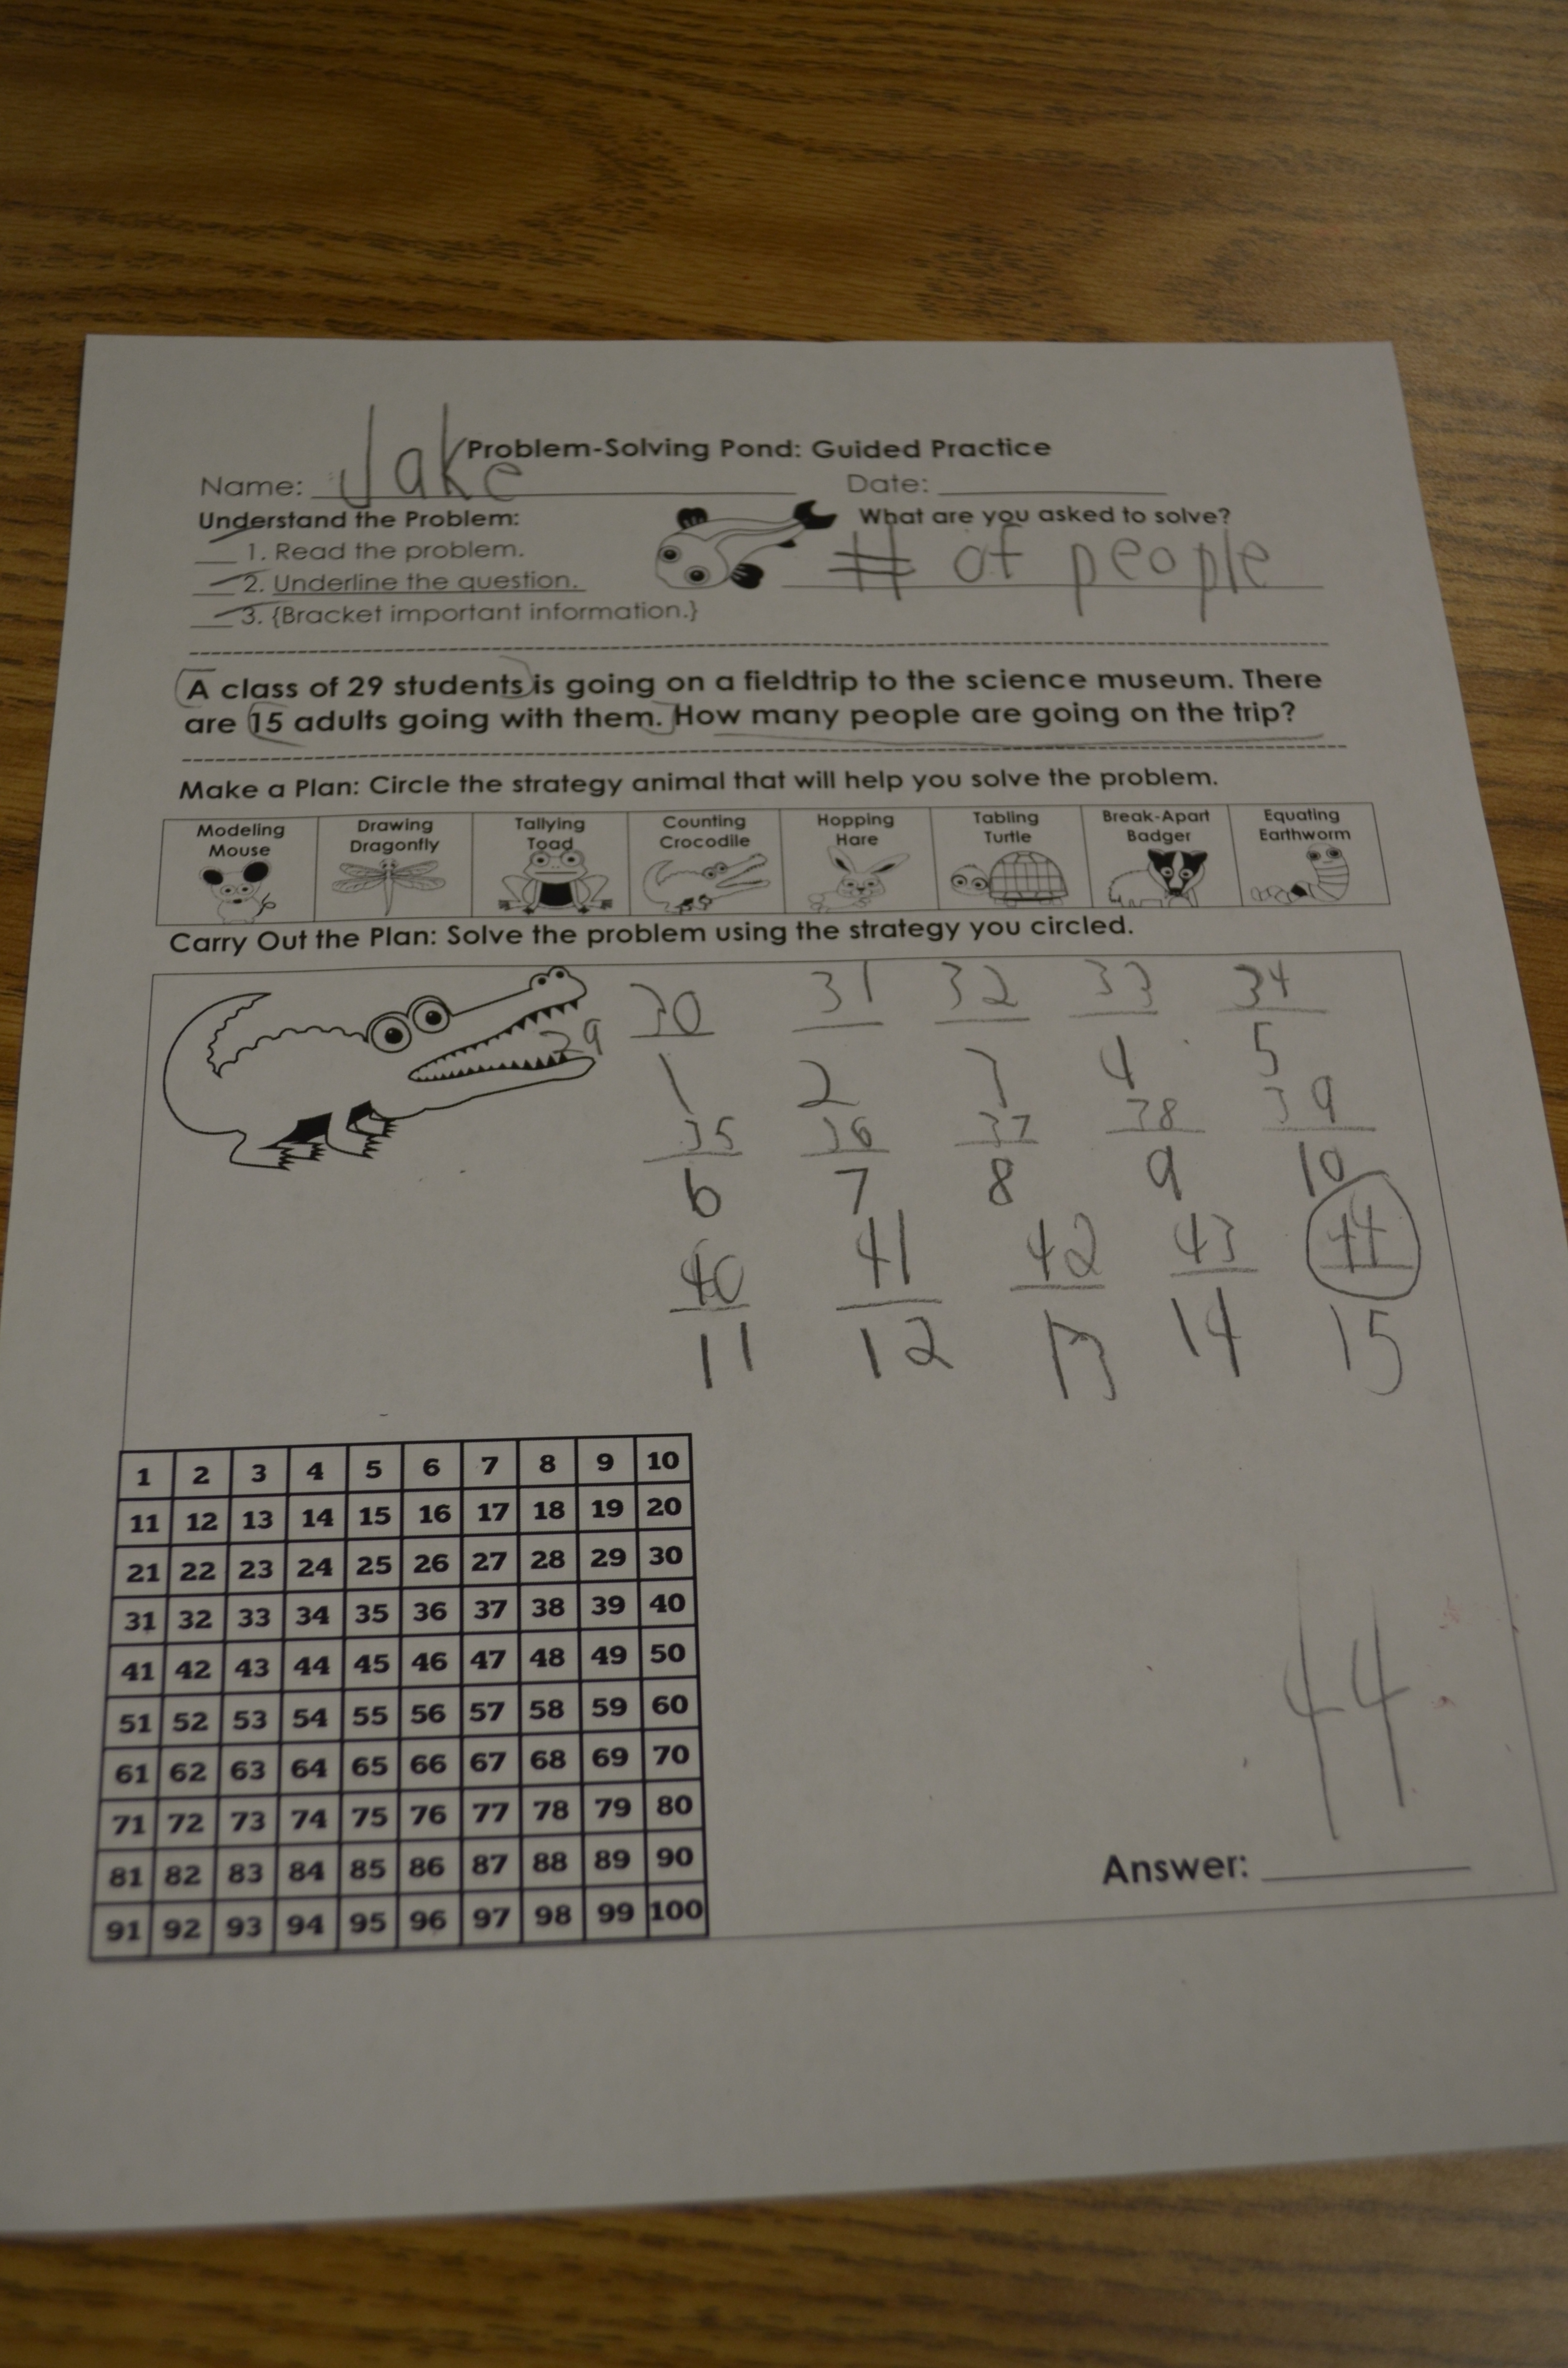
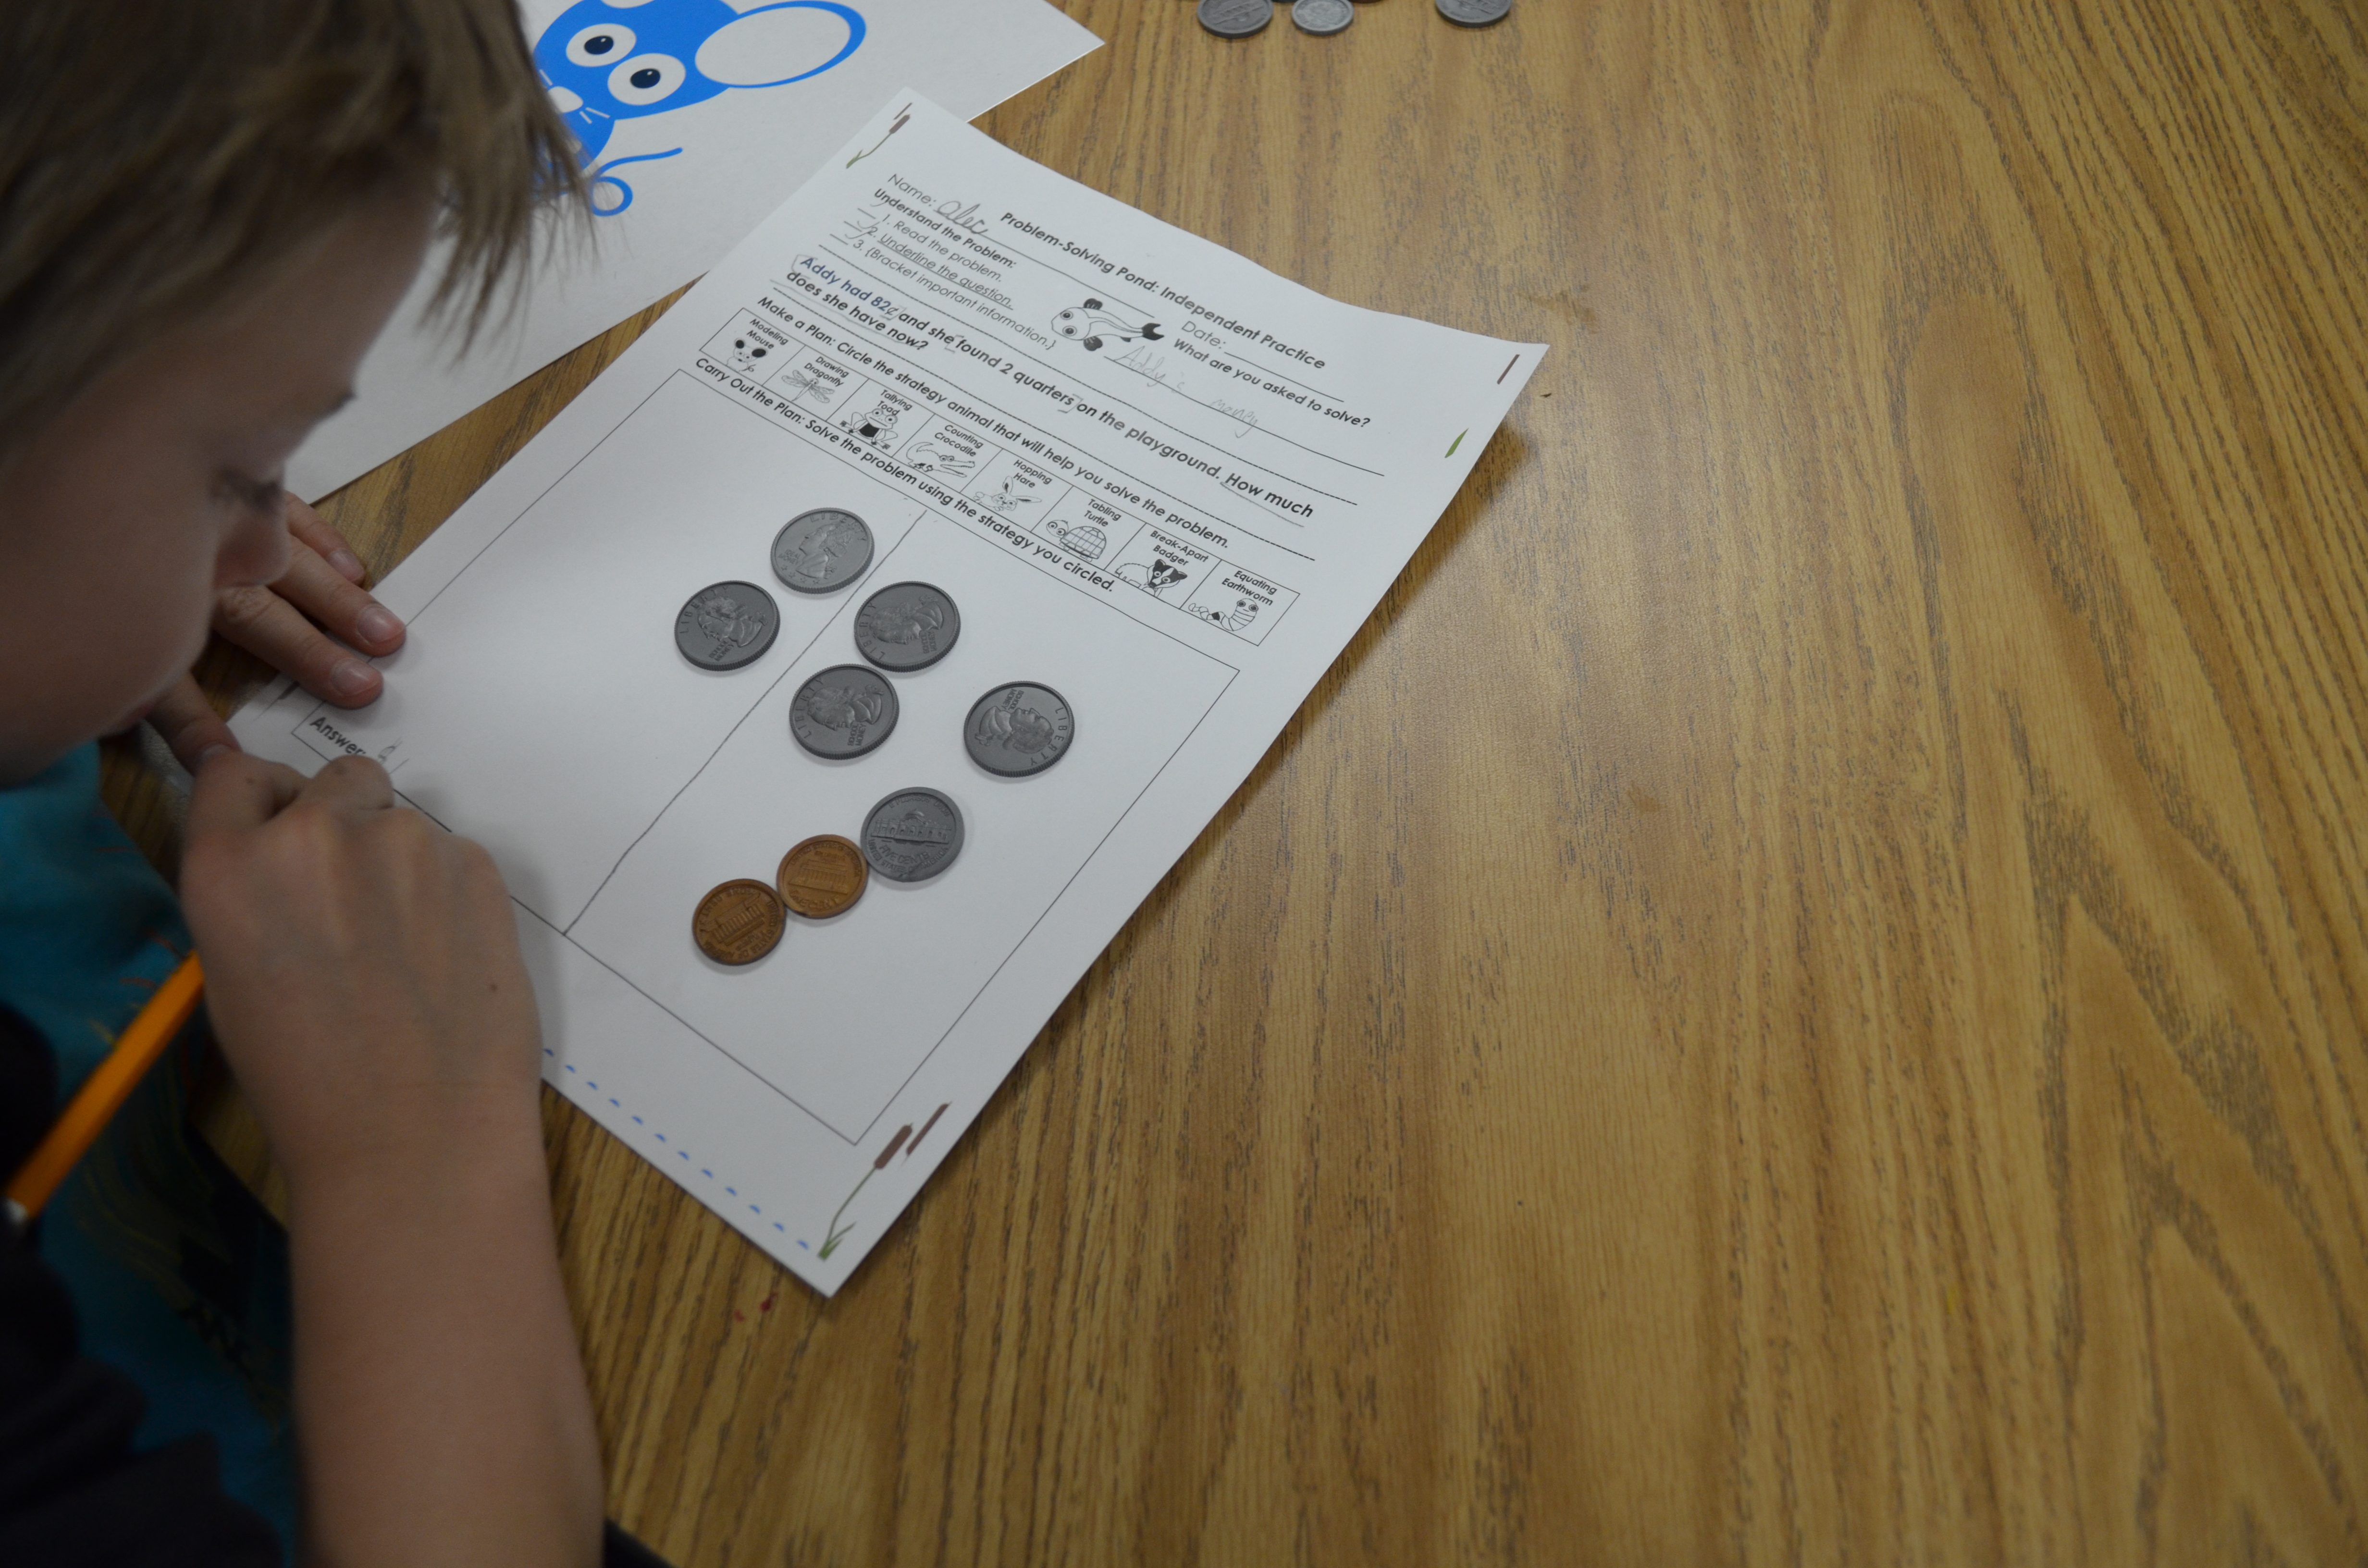
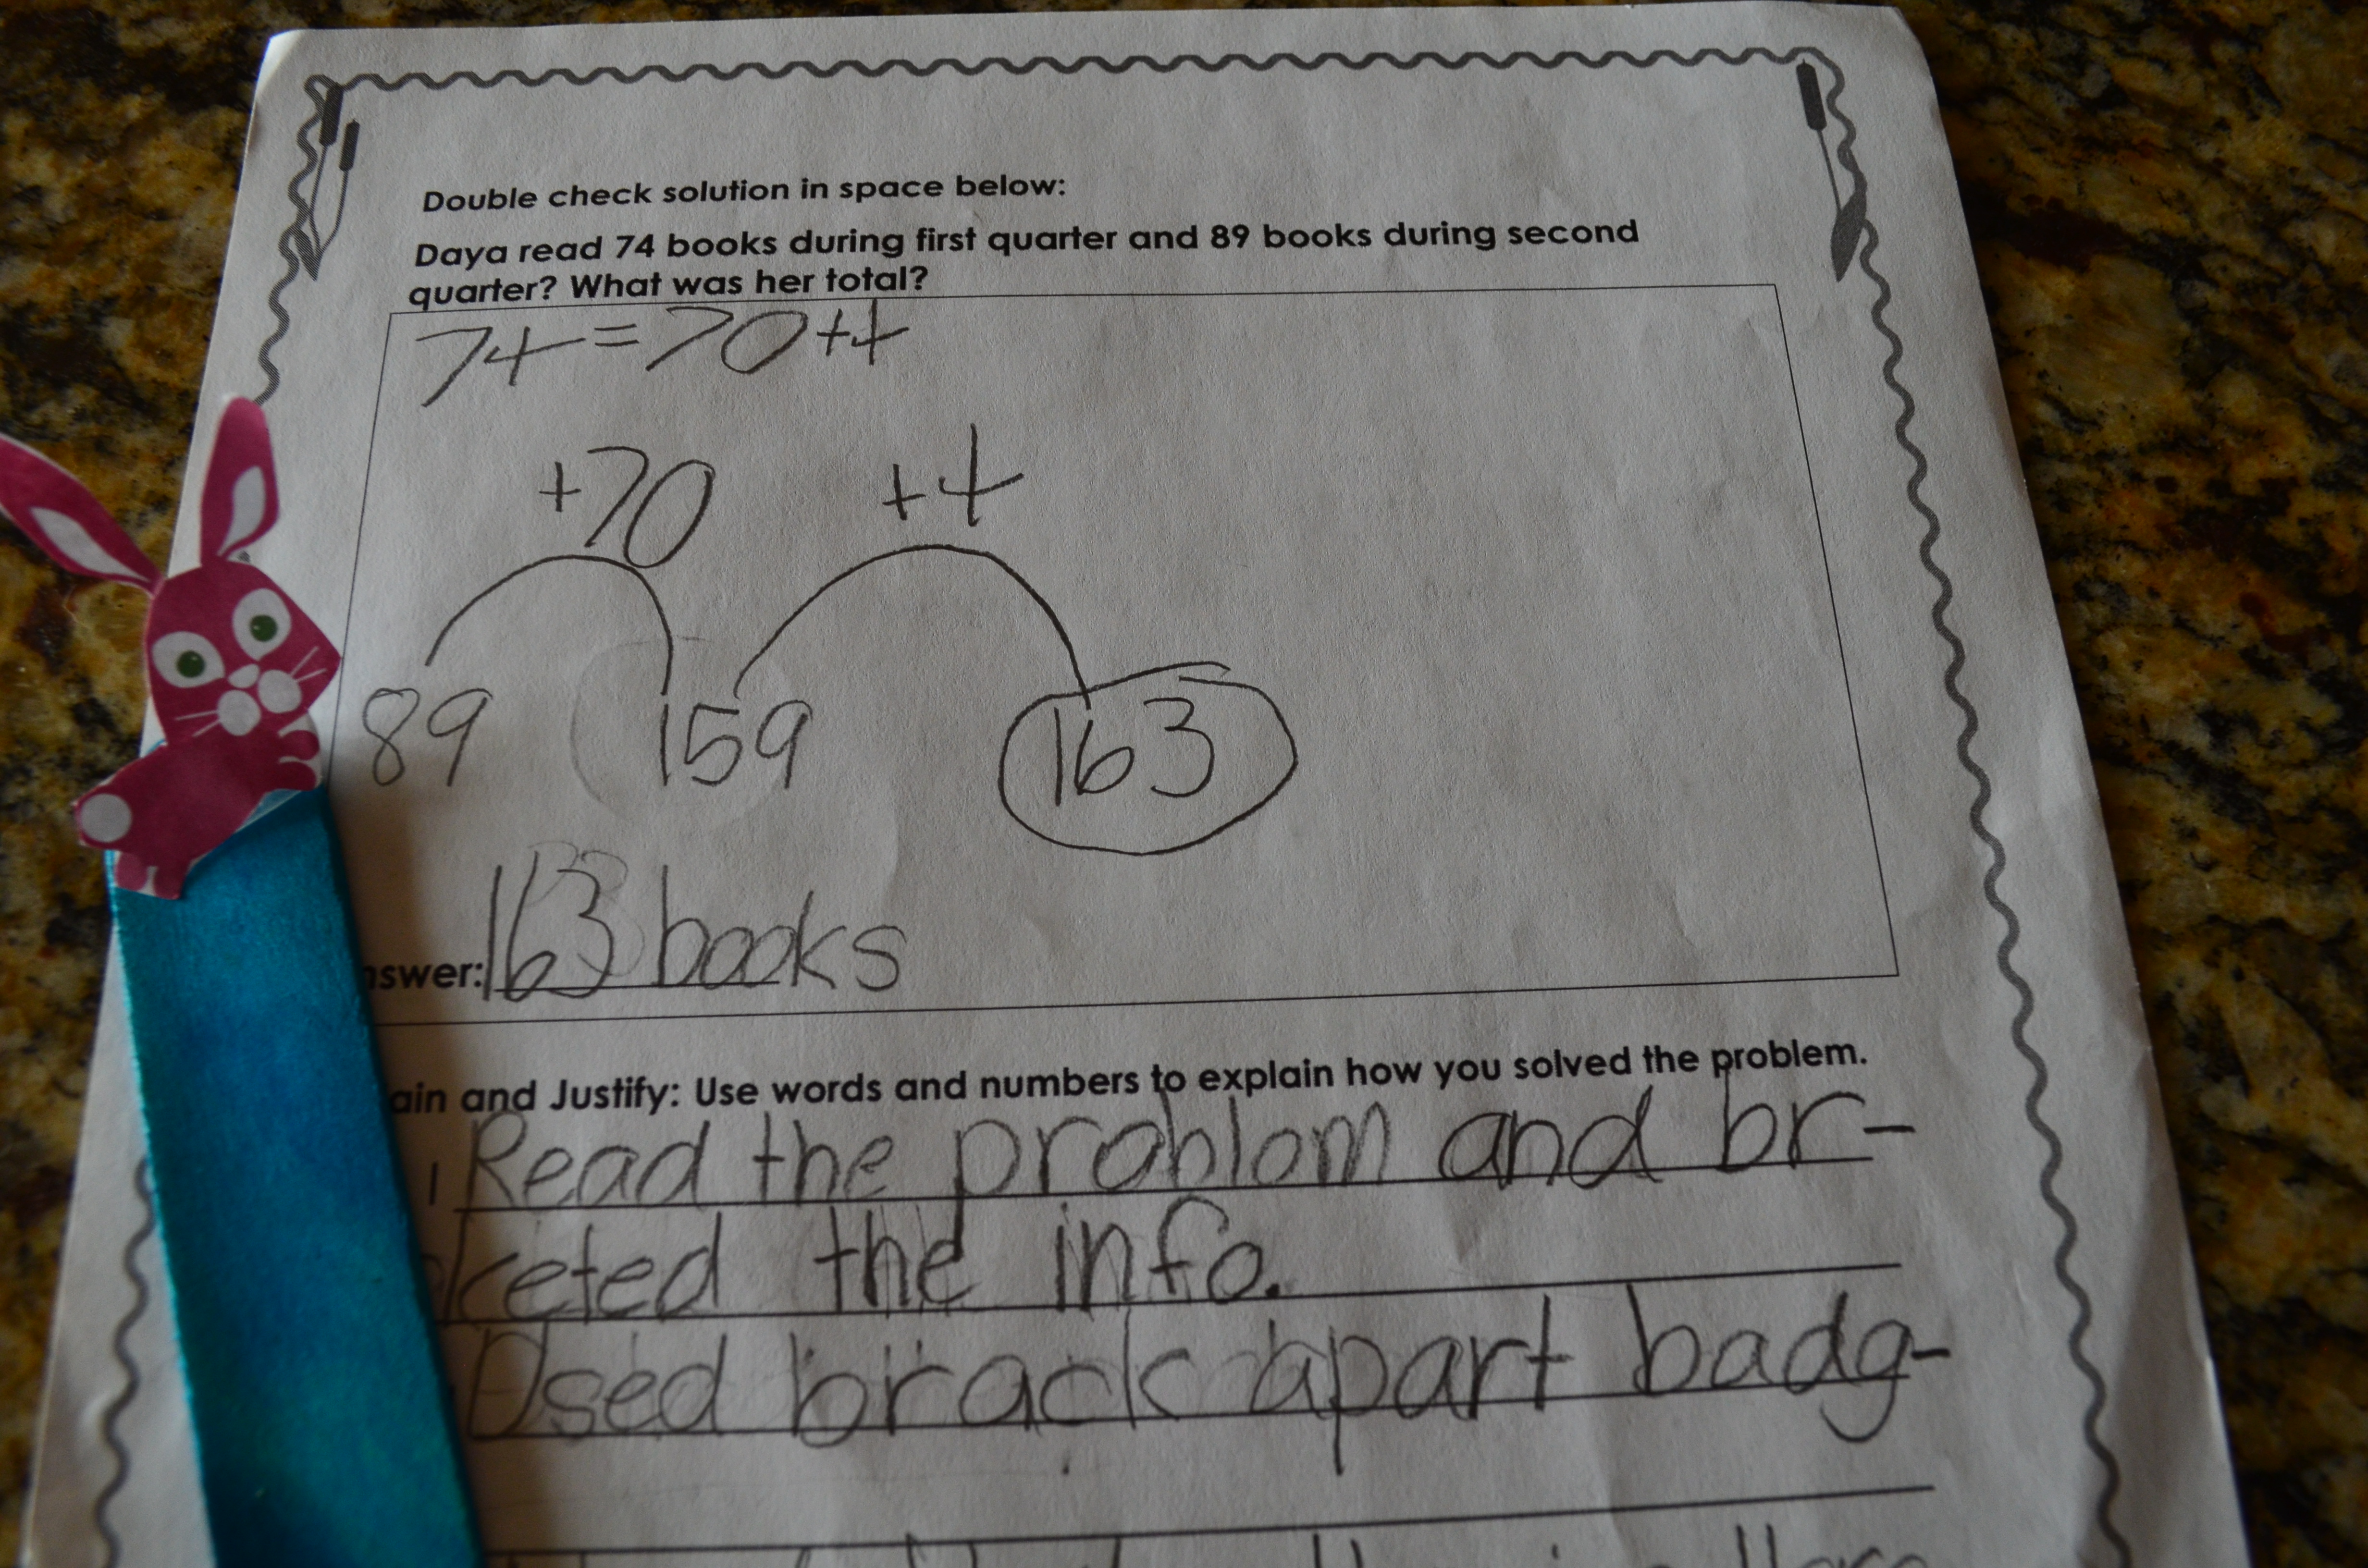
WHAT is hopping? Students use place value and number sense to add or subtract numbers. Students first start with the bigger number in the problem; this number is the starting point for hopping. Then they decompose or break apart the second number by place value (into 10’s and 1’s). Depending on the problem, students will either add or subtract, hopping first by 10’s and then by 1’s. Students label numbers above hops to help ensure solution is correct.  Read more about Hailey’s strategy below or download the complete unit here.

Hopping example 2

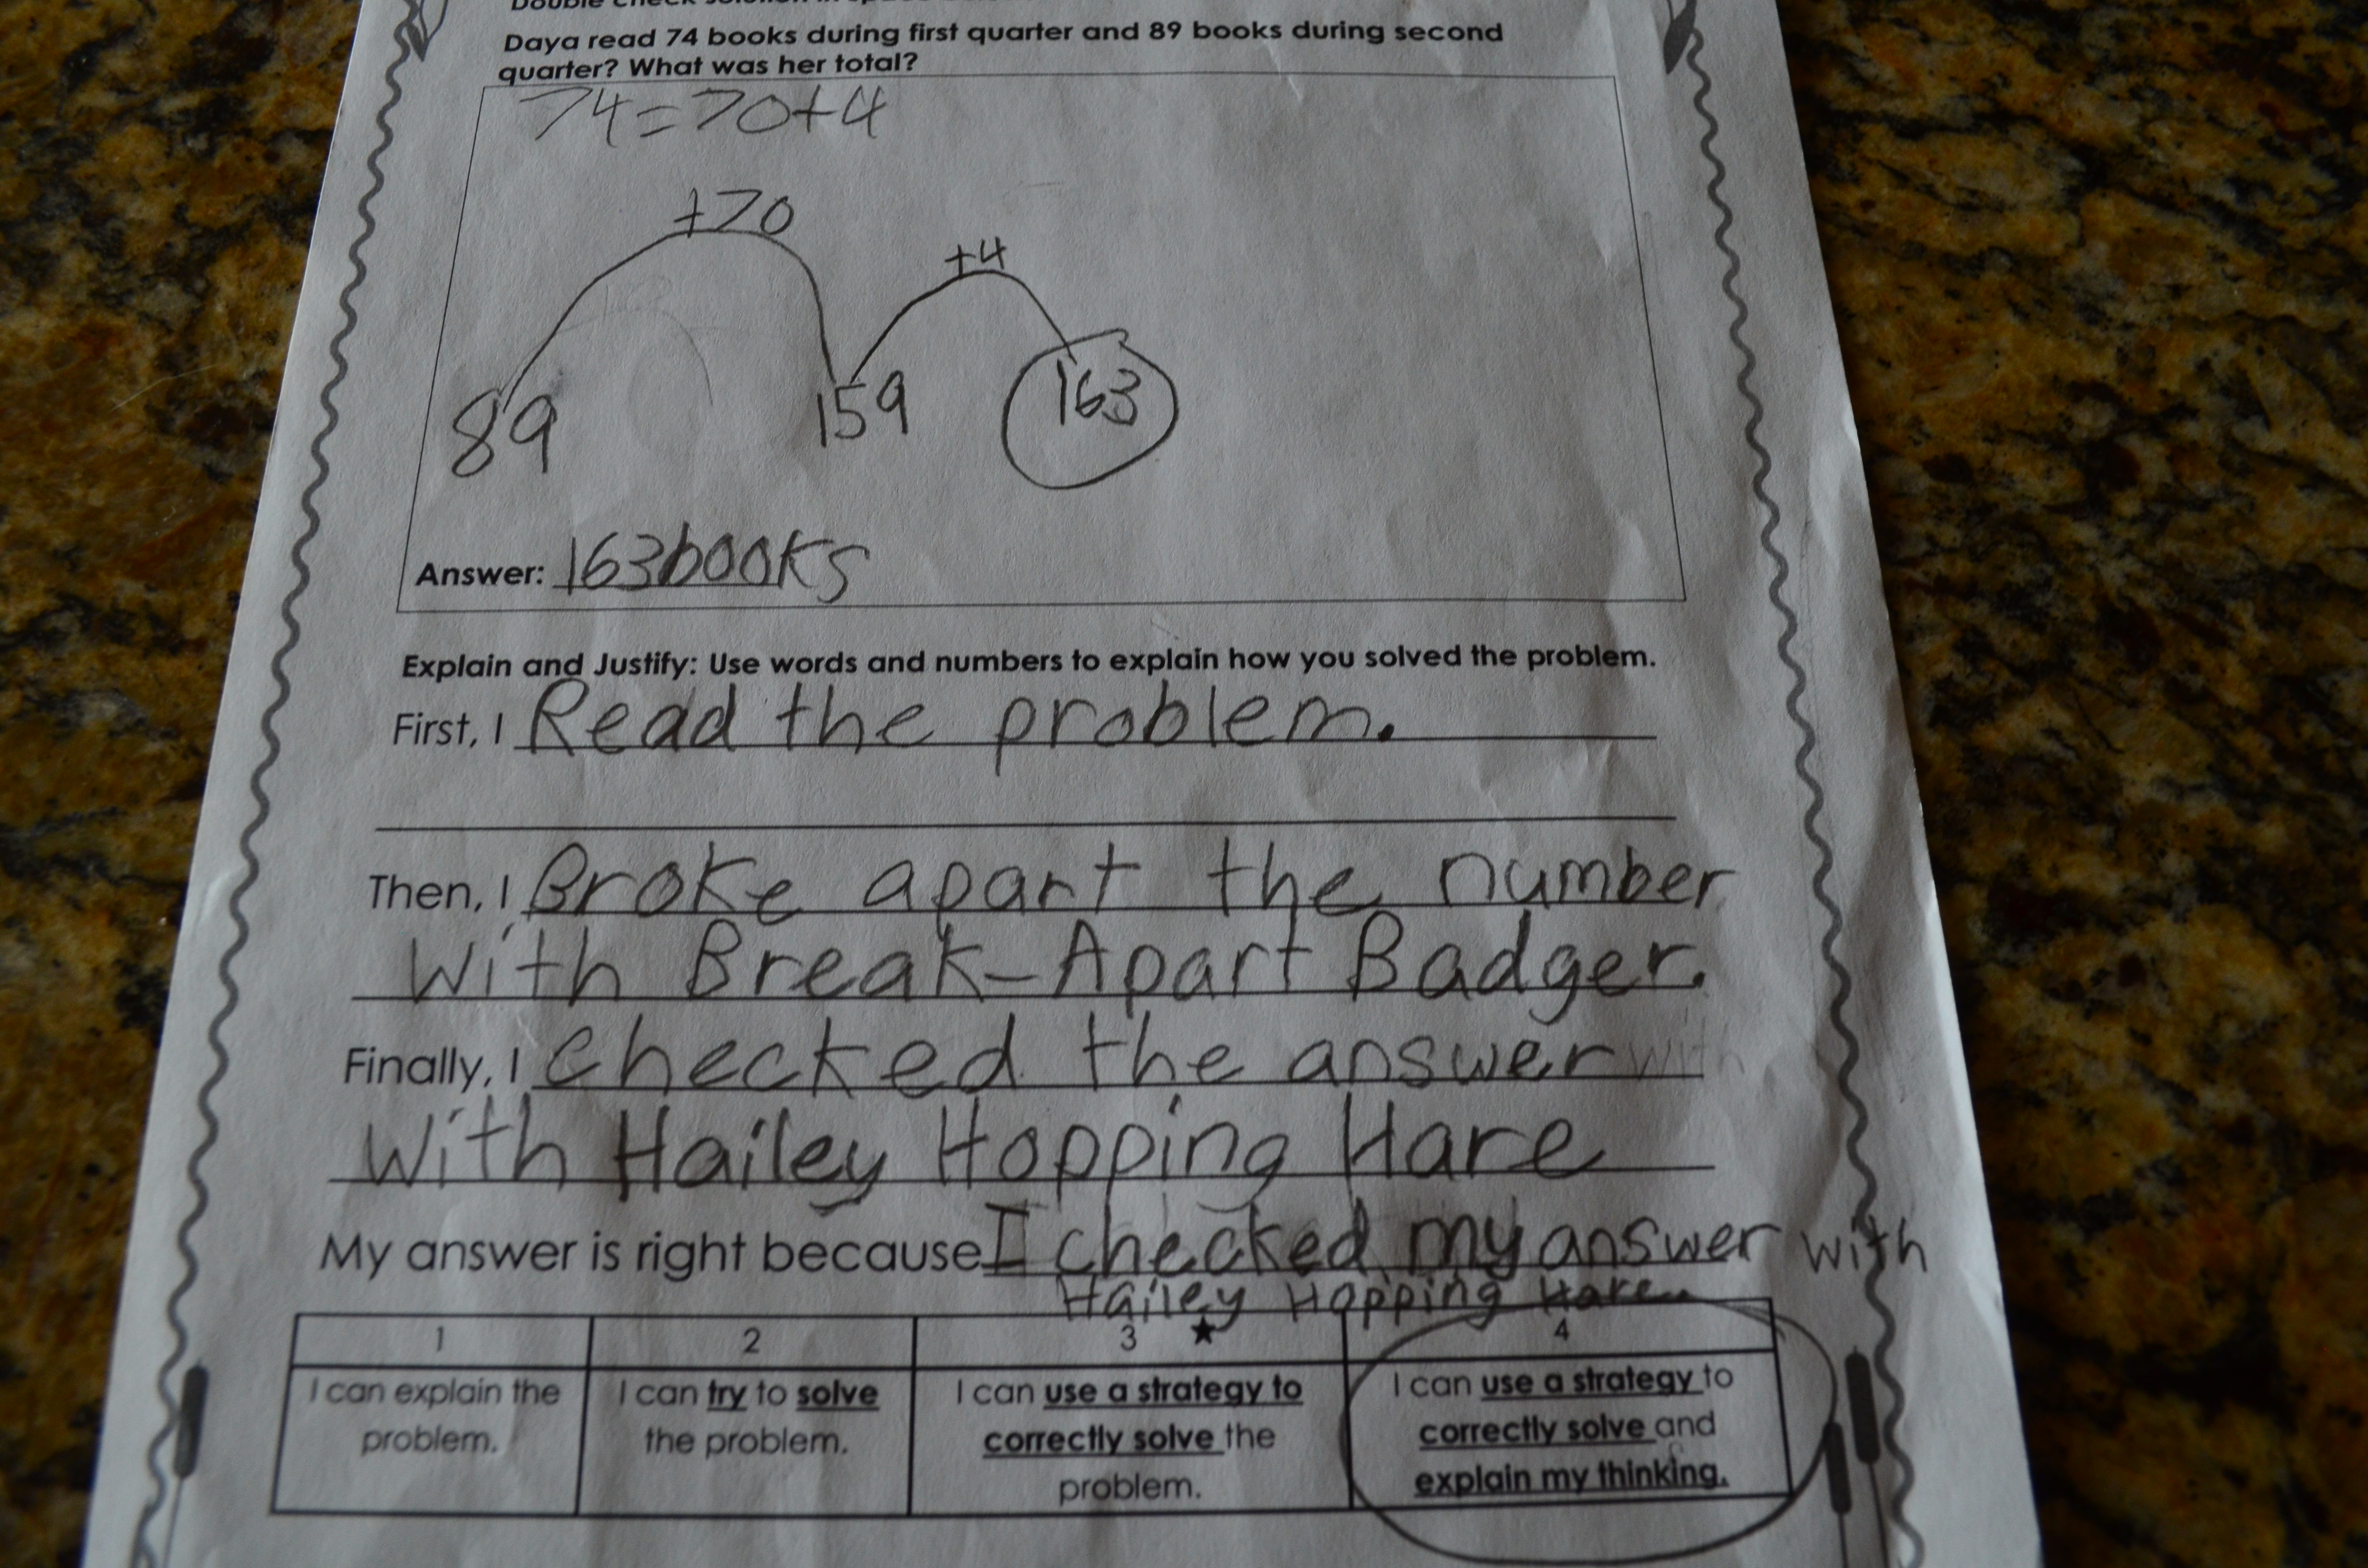
WHY is hopping important?  When students use the hopping strategy, they are essentially skip-counting by 10’s and 1’s. This helps strengthen mental computation, builds number sense and solidifies foundational place value skills. It also serves as an efficient method for students to double-check solutions. Furthermore, hopping can easily be extended to larger numbers and multi-step problems because it tracks mathematical thinking and steps taken to complete problem.

HOW do I teach hopping? Teach hopping in isolation first so that students become familiar with the process of identifying larger number and decomposing smaller number by place value.  Use patterned, pre-labeled or open number lines until students can proficiently count and track hops (see examples). After proficiency is demonstrated, introduce an open number line where students determine the starting point then draw and label hops without support.

Hopping Lines 5s


Hopping Lines 10s


Open number line

WHEN should I use hopping? This is an ideal strategy for developing mathematicians who have a solid place value and number sense foundation. It is most effective to introduce the hopping strategy after students become proficient with the counting strategy. When larger numbers are used, students quickly realize that counting becomes inefficient and laborious. Hopping allows students to employ counting skills they are comfortable with, but increases rigor and mathematical practice.

Helpful hints:

Supply models and provide kinesthetic practice.  Select appropriate number lines according to students’ individual needs. Some students will easily grasp hopping and will be able to use the open number line while others will need the patterned number line to see and count the 10’s and 1’s. Make a large patterned number line for kinesthetic learners and have them physically hop the numbers. Students will not only love this activity, the multi-modal approach reinforces learning.

Kinesthetic number line 2

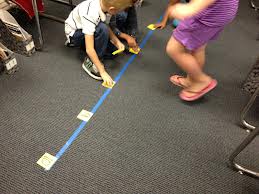
Make Hailey pointers. Cut out and laminate Hailey patterns and use a hot glue gun to adhere to craft sticks. Students can use a Hailey pointer to hop the numbers in each problem.

Hailey puppet

Practice skip-counting. Some students struggle with skip counting and could benefit from repeated practice. Chanting by 100’s, 10’s and 1’s while walking in line, calendar time, even clean-up time all serve as great practice opportunities. Be sure to vary starting points so to ensure that students aren’t just counting by multiples of 100’s, 10’s or 5’s. (For example start at 57 and count by 10’s, then switch and count by 1’s.)

Be flexible with students’ hopping methods.  Remember, the whole point of teaching strategies is to help students become fluid, flexible thinkers with deep conceptual understanding. While Hailey teaches students to start with bigger number and hop by 10’s and then 1’s, do not insist that students need to only hop this way. It is imperative to allow them to experiment and try multiple methods in order to find the most meaningful and efficient hopping method for themselves. Some hop to the nearest multiple of 10 and then continue hopping by 10’s, while others hop by all of the 10’s in one hop. Accept all methods if students solve problem correctly, explain method and apply across settings.

different ways to hop


Introducing Daphne Drawing Dragonfly

Hi, I’m Daphne the Drawing Dragonfly.
Draw a mathematical picture to give my strategy a try.
Read the problem and draw what’s going on;
Then write a number sentence for what you have drawn. 

Daphne Drawing Dragonfly is our newest animal in our Problem-Solving Pond: A Common Core Math Strategy Unit. The Problem-Solving Pond was created to help teachers overcome Common Core math challenges and employ problem-solving strategies with confidence and fidelity. Daphne’s unit is perfect for general education, special education, RTI and math intervention. Read more about Daphne’s strategy below or download the complete unit here.

WHAT is drawing? Students make a visual representation of the story problem such as a picture, bar model, tens frame or array.

Jake bar model

WHY is drawing important? When students use the drawing strategy, they are making a concrete representation, strengthening understanding of the mathematical concepts.  Effective math classrooms include frequent use of pictorial representations to help students process and visualize mathematical concepts learned.

HOW do I teach drawing?Teach students to create neat, organized drawings with labels and numbers. Students will need to be taught the bar model and arrays, but it is best to let students create the pictorial representation that they see and works for them.

WHEN should I use drawing? This strategy is ideal for presenting a new mathematical operation.  Most teachers use this strategy with K-2 mathematicians, but this is also beneficial for older students as it works especially well with money, fractions, ratios and percentages. Drawing is a great way to double-check solutions because the visual representation increases understanding of the problem.

Helpful hints:

  • Create drawing guidelines. As a class, decide important components to include in a mathematical drawing. Possible components include:
    • Simple drawings
    • Appropriate spacing
    • Neat labels (words or numbers)
    • Easy to read

Guidelines for math pictures

  • Encourage students to use a variety of pictorial representations.  Often students will get in a “strategy rut”, relying on one strategy for many different kinds of story problems. While drawing is an effective strategy for most problems, the type of pictorial representation used depends on the type of story problem.

Types of Pictorial Representations2_Page_1


Presenting Tallying Toad

Hello, I’m Tallying Toad.
I get you started on the problem-solving road.
A tally mark is a straight line to show one;
Group tallies into five is how it’s done.
First make four tallies, nice and straight;
Then make a diagonal fifth tally and you’re doing great!
 

Todd Tallying Toad is our newest animal in our Problem-Solving Pond: A Common Core Math Strategy Unit. The Problem-Solving Pond  was created to help teachers overcome Common Core math challenges and employ problem-solving strategies with confidence and fidelity.  Read more about Todd’s strategy below or download the complete unit here.
WHAT is tallying? Students use tally marks to show the numbers represented in the story problem.

Ella

WHY is tallying important? When students use the tally strategy, they learn to count and notate groups of 5, strengthening number sense in the process. Tallying is an easy, quick way to double-check solutions for kindergarten and first-grade students.

Ella working

HOW do I teach tallying? Teach tallies in isolation first so that students become proficient making neat, organized tally marks. After proficiency is demonstrated, introduce tallying as a problem-solving strategy and teach students to apply within a mathematical context.

Tally example

WHEN should I use tallying? This is an ideal strategy for beginning mathematicians who are learning to count and record numbers. Tallying is a great way to represent smaller numbers in story problems. Students get comfortable with tallies and will try to apply to larger numbers, making some teachers cringe. Refrain from discouraging use of tallies for larger numbers; students must independently develop understanding that tallying is not an efficient, effective strategy for story problems with larger numbers.

Helpful hints:

• Supply models and provide kinesthetic practice. Beginning mathematicians often lack dexterous fine motor skills, which can impede formation of neat, straight tally marks. Provide craft sticks, Wikki Sticks or pipe-cleaners (cut in half) and have students make a model of the tallies before drawing them on paper. Allow students to practice kinesthetically in salt or Jell-o trays or trace on bumpy paper. Students can also practice making tallies with Play-Doh.

tally mark craft sticks Include visual support. As beginning mathematicians start to use tally strategy, they need visual support to ensure that tally marks are straight neatly organized into groups of 5.


• Practice counting by 5’s. Some students struggle with skip counting and could benefit from repeated practice. Chanting 5’s while walking in line, calendar time, even clean-up time all serve as opportunities for fun skip counting practice.

Counting by 5 hands

Settle Spring Fever with “Miss Nelson Is Missing!”


Do you ever feel like Miss Nelson, calmly asking the class to settle down while they choose to squirm, giggle and whisper instead? As spring fever hits, patience and persistence decreases and our inner Viola Swamp starts to emerge.

Can you relate? Our Miss Nelson Is Missing! Unit is the perfect way to engage students while providing effective instruction aligned to Common Core State Standards. A built-in behavior system helps keep those squirms, giggles and spring fever symptoms under control.  A preview of our favorite Miss Nelson Is Missing! activities is included below. Download the complete unit here.

1. Create a visualization and take a Visualization Venture.  During reading group time, students closed their eyes and I read the passage aloud. They then put up privacy folders and drew a visualization using key words from text.

VernVisualizing Vulture 2

Vern Vulture visual

After reading groups, we took a Visualization Venture; students silently walked around room, observing similarities and differences. They discussed observations with seat partners and then we discussed as a whole group.  The class immediately recognized that most had elements listed in the text (i.e. spitballs, paper airplanes, misbehaving students), but the details of the characters and layout of classroom were different because people picture things differently based on their backgrounds and experiences.

2. Make character analysis puppets. I glued two lunch bags together with bottom flaps on top and facing out to make a hand puppet. Students colored and cut out Miss Nelson and Viola Swamp heads and glued one head on each flap. Then they cut out descriptive phrases and glued on appropriate character. To differentiate, you could have students record their own descriptive phrases for each character, using specific evidence from the text.

Character analysis puppet 23. Use a Venn Diagram to compare classes. We used a Venn Diagram to compare our class to Miss Nelson’s class. While my class is usually well-behaved and on-task, they have been extremely talkative and hyper, two tell-tale symptoms of spring fever. One of my students   suggested that we add talkative to Miss Nelson’s class; I asked if that fits our class as well. Sheepishly they admitted it did and we reviewed     appropriate talking times. “We don’t want a visit from Viola Swamp,” I said in a stern, serious voice. “Remember what she did to the kids in Room 207? That would be horrible, especially right before spring break!” I reminded them.  While several cracked a little smile, a few looked very serious and it planted the seed for upcoming plans.

Venn diagram

4. Post Viola Swamp sign. The next morning I posted a large sign that said, “Viola Swamp Is Watching You” on my classroom door. I simply enlarged Viola’s head on the copier and colored with crayons. I typed out the text and placed around her head. Before we walked into the classroom, I showed the class and reminded them that we didn’t want a visit.  Every time we left or entered the classroom, a few would whisper, “She’s watching us!”

Swamp Sign

5. Make Viola Swamp behavior slips. Since I had a few believers, I knew I could capitalize on their naivety with Swamp Slips, behavior notes placed on a few students’ desks each night before I left school. In the morning, the few that received a Swamp Slip would immediately remedy misbehavior (disorganized desk, shouting out, loud in line, etc.).  If someone displayed symptoms of spring fever, another classmate would whisper, “You don’t want a Swamp Slip!”

Swamp Slips

6. Dress up as Viola Swamp. On Friday, the last day of our unit and the last day before spring break, I decided to dress up like Miss Swamp. I wore an old, black dress, wide belt, a curly wig and knee-high argyle socks. I placed thick, black moustaches on my eyebrows and made one into a hairy wart for my chin. The finishing touch was a large witch nose I found at a local party store—it completed my Viola Swamp transformation.

Viola Swamp gear

I had the teacher next door walk out to get my class, telling them that she hadn’t seen me all morning. She told them to get unpacked while I hid out in the school library. After 5 minutes, I swung open the classroom door and screamed, “I am your new teacher, Miss Viola Swamp!” and I rapped the nearest desk with a ruler.  The kids look horrified at first, but then one shouted out, “It’s just Mrs. Murphy!”  I kept the costume on and took pictures with each of them.

7. Make a Swamp Snack. At the end of the day, students followed a recipe to make a Swamp Snack recipe. They absolutely loved it and they were reading functional text and using measuring tools in the process. It was the perfect culmination activity!

Swamp snack 2


Introducing Clark Counting Crocodile

I’m Clark the Counting Crocodile. Use me to help you count.
Start with the largest number, and draw lines for the remaining amount.
Count on for addition, count back for subtraction;
Then circle the answer as your final action. 

Jake with clark

Clark Counting Crocodile is the second strategy animal in our Problem-Solving Pond: A Common Core Math Strategy Unit. The Problem-Solving Pond  was created to help teachers overcome Common Core math challenges and employ problem-solving strategies with confidence and fidelity.  Read more about Clark’s strategy below or download the complete unit here.

WHAT is counting?As students build their number sense and fluency, they are able to solve a story problem with counting.  In this strategy, students will learn to count on for addition and count back for subtraction using a 100’s chart for support as needed.

WHY is counting important?Counting is a crucial strategy because it helps students explore the relationships and patterns between numbers. Students need to recognize the order of numbers so they can understand that it is more efficient to start with bigger number. For example, in order to solve “4+27,” they should start counting from 27 and progress to “28, 29, 30, 31” instead of starting from 4 and progressing to 31, because in the latter case, they would have to count much more, increasing the possibility of errors. Proficient counting lays the foundation for number sense and place value.

Jake counting2

HOW do I teach counting? Explain that Clark helps mathematicians solve problems by counting on to find the total or counting back to find the difference.

  • Counting on for addition: Students start with largest number in the problem; they put that number in Clark’s mouth and then draw the number of lines for the second number in the problem (if the second number is 14, students would draw 14 lines). Students then label the lines (below the line) and count on, writing each number above the line. Students circle the answer and write equation below to solidify understanding. Clark example 2
  • Counting back for subtraction: Students start with the largest number in the problem; they put that number in Clark’s mouth and then draw the number of lines for the second number in the problem (if the second number is 14, students would draw 14 lines). Students then label the lines (below the line) and count back, writing each number above the line. Students circle the answer and write equation below to solidify understanding.

WHEN should I use counting? This strategy isideal for problems that include smaller numbers.  Most teachers use this strategy with K-2 mathematicians, but this is also beneficial for older students as it works for money, multiplication and division (included in unit).

Helpful Hints:

  • Create counting bags.  Create counting bags with different numbers of objects in each bag and a set of appropriate number cards. Use common manipulatives such as cubes, beans, tiles for bags. Students also love seasonal items such as conversation hearts, acorns, pumpkins, shamrocks, etc.  Have student count objects in each bag and then select the number card to name that amount. Students can simply place the objects and number card back into the baggie for checking. Mark the bags with letters or shapes for easy checking of student work.

counting bag

  • Provide opportunities for strategy exploration. Allow students to build conceptual understanding by having them solve a counting problem in multiple ways. Students can solve the problem starting with the big number first and double-check solution by starting with the smaller number first. This exploration will guide students to recognize that while it is more efficient to start with the larger number in the problem, number order does not affect the sum. Provide templates with larger numbers; this will help students observe that the counting strategy is not efficient for larger numbers.


Celebrate Dr. Seuss & Read Across America

Use this easy, fun Cat in the Hat kabob recipe to wrap-up your Read Across America & Dr. Seuss celebration. You only need 3 ingredients—large marshmallows, red Swedish fish and kabob sticks to make this snack. (Use strawberries and bananas instead for a healthy kabob). This activity includes Common Core State Standards as students are reading functional text and answering text-dependent questions. Download kabob recipe here.

cat in hat ingredients

dr. seuss kabob 1


Here are some other easy, engaging Dr. Seuss activities:

1. Goldfish graphing: Read One Fish, Two Fish, Red Fish, Blue Fish. Give each students a bag of colored goldfish and have them sort and graph colors. Students can also complete probability experiment by forming hypothesis (which color will be pulled most), pulling fish and recording results.

goldfish graphing1

2. Feet Measurement: Read The Foot Book and have students measure their feet. You can also print a variety of feet and have students measure and record. Discuss results.

Feet measurement1


3. Inexpensive incentives: These Dr. Seuss pencils, erasers, bookmarks and resuable bags are available in the Target dollar section. These are perfect behavior incentives, treasure box items or Read Across America gifts.

Cat in hat rewards


Meet Max Modeling Mouse

Greetings I’m Max the Modeling Mouse.
I solve problems by using things from my house.
Beans, cubes and counters are useful math gear;
Use them to model the problem so it’s clear.

Max Modeling Mouse is the first strategy animal in our Problem-Solving Pond: A Common Core Math Strategy Unit. The Problem-Solving Pond  was created to help teachers overcome Common Core math challenges and employ problem-solving strategies with confidence and fidelity.  Read more about Max’s strategy below or download the complete unit here.

WHAT is modeling?:  Students use manipulatives, counters or drawings to model, or represent the mathematics of the story problem.

WHY is modeling important?: By making a visual representation, students are able to see the situation presented in the problem.  Modeling is critical to student understanding as it allows students to see, feel and process math in a concrete way.

Jake Mouse

HOW do I teach modeling?:  Select appropriate manipulatives (beans, cubes, coins, place value rods) and make a visual model of story problem.  Write equation below the model to solidify understanding.

Alec Mouse

WHEN should I use modeling?:

This strategy is ideal for presenting a new mathematical operation.  Most teachers use this strategy with K-2 mathematicians, but this is also beneficial for older students as it works especially well with money, fractions, ratios and percentages. Modeling is a great way to double-check solutions because the visual representation increases understanding of the problem.

Helpful hints:

  • Create rules and expectations. Before introducing manipulatives, establish rules and expectations for use. Explain the mathematicial purpose of them as well as how and when to use them. Practice essential routines such as getting out manipulatives, freezing at teacher’s signal (with hands-off manipulatives) and cleaning up quickly and quietly.

Manipulative rules

  • Prepare manipulative bags. Count out specific manipulatives and store in individual Ziploc bags or small Tupperware containers so they are ready to use at any time.  These individual units can be stored in student desks or in a large container.

Manipulative bags

  • Store manipulatives in a common area. Purchase an inexpensive storage container with shelves and house manipulatives here. Label each shelf and include a picture or glue on an example for student reference.

Manipulative storage

  • Allow time for student exploration and play. Before students use the manipulatives as mathematicians, provide time for exploration and play. This will help students stay focused and use them correctly during math time.

Check out our other Problem-Solving Pond strategy animals coming soon:
–Drawing Dragonfly
–Tallying Toad
–Counting Crocodile
–Hopping Hare
–Tabling Turtle
–Break-Apart Badger
–Equating Earthworm
–Fact Fluency Fox

Math Animals with names


Meet Sally the Sounding Out Snake

“SSSSSSSalutations! I’m Sally the Sounding Out Snake,
Stretch each sound out and a new word you will make
Put them back together in a blend
And your reading will be on the mend.”

It is so exciting when beginning readers start to blend individual sounds together to form words.  I remember how thrilling it was when both of my boys started to read in pre-school.  I marked the day in their baby books along with their first words, first steps, and first bike ride without training wheels.

I used Sally the Sounding Out Snake’s poem and graphic organizer to teach them how to segment and blend words for reading and spelling. This tool made reading multisensory as they were able to engage the visual, auditory and tactile senses.  After seeing such success with my boys, we brought Sally into the classroom and created supplemental lesson plans, additional graphic organizers, worksheets, and flashcards.  Our students experienced the same success in the classroom.

Sally Snake 2

Your students can meet Sally too along with our other reading strategy animals in our complete Common Core Guided Reading Strategies Unit.

Individual supplemental Sally Sounding Out Snake units focus on a variety of one-syllable word combinations and are a great supplement to any general education, special education or intervention curriculum. This can be used during whole group, literacy centers, or as independent work.

Aligned with Common Core Literacy Standards in grades K-2, each unit includes the following activities and worksheets:

  • Differentiated lesson plans for sounding out words
  • Suggestions for use
  • 4 Graphic organizers for decoding and spelling
  • 7 Phonics worksheets for decoding and spelling
  • Word lists for one-syllable words (sorted by vowel type)
  • 32 Flashcards and activity ideas
  • Sounding Out Snake poster and puppet graphic
  • Decoding and Comprehension strategy poster
  • 4 Sentence writing worksheets with word banks and editing checklist
  • Customizable worksheets to allow for differentiation

Check out each “Common Core Phonics Activities for One-Syllable Words” unit below:

#1 CVC
#2 Digraphs
#3 Blends
#4 Double Letters f,l,s,z
#5 R-Controlled Vowels
#6 Silent e

Cooking in the Classroom

Cooking is a fantastic way to synthesize many skills and concepts. It promotes higher-level thinking skills such as analysis, synthesis and evaluation. Since we want our children to function independently as they grow, what better way to develop and foster this than through cooking? Here are some of the benefits cooking provides students:

–Builds math skills (use measurement, fractions, numeric properties, sorting and classifying)

–Strengthens reading skills (teaches recipes and directions; promotes vocabulary development, use of ordinal words and oral expression)

–Creates opportunities for science exploration (use of senses, make predictions, note physical changes, identify foods)

–Promotes social studies and collaborative skills (fosters teamwork and collaboration, recreates family experiences and promotes cultural awareness)

In order to start cooking in your classroom, simply download our Classroom Cooking: Recipes & Functional Text ActivitiesThis unit contains 17 tried and true recipes tied to CCSS; all are connected to literature, focus on holidays or seasons and have accompanying comprehension questions. A parent letter is included to explain unit and request donations.  Bon Appetit!

022

Practical Presidents’ Day Project

Students love learning about presidents, so what better way than with this easy, adorable president report? Use Target’s U.S. Presidents flashcards (found in the dollar section) or an online source to complete shared research and written report as the one listed below.

President report with cards

Report Directions:

1. Select appropriate presidential cards. These would be the ones that students would find most interesting (cool nicknames, facts, etc.). Remove cards that would be difficult to read and understand. (Remove Nixon as his nickname is “Tricky Dick”.)

2. Model completing president report. Use information from card and think aloud as you go

3. Differentiate assignment according to students’ needs. Students can choose a president or you can assign a president to research. Partner students or have students work individually to complete the report.

4. Draw presidential portrait. Give students white paper and have them draw a pencil sketch of selected president. Trace with Sharpie and then color with crayon. Cut out and glue on top of report. You can glue on black construction paper (to look like a suit) and add arms and legs if you desire.

5. Share report with class. Possible discussions include similarities (most were lawyers), differences, occupations, facts and achievements.

6. Set up Prestigious Presidents center. Add leveled, nonfiction text, artifacts and portraits of presidents. Students can record new learnings on Post-Its or in journal. They can also complete another president report with the president cards or other sources.

Prestigious presidents


Download this practical presidential project here.

Meet Charlie the Chunking Chipmunk

“What’s up? I’m Charlie the Chunking Chipmunk.
I help you break unknown words into small chunks.
Look for little words or sounds that you know,
Put them back together as a word and you’ll be the star of the show!”

Moving from decoding one syllable words to two and three syllable words can be very challenging for many students.  As students begin reading multi-syllabic words, it is important for them to know how to break words into units larger than individual sounds.  Charlie the Chunking Chipmunk gives students the skills and practice they need to become efficient at decoding longer words.

My students love when I bring out Charlie!  When using his strategy, they feel confident and encouraged to read “big” words in isolation and in context.  Our complete, 130 page, phonics unit includes activities, worksheets, and printables for the following syllable types: Closed, closed with blends, vowel-consonant-e, -le, open, r-controlled, digraphs and diphthongs. This unit is great for guided reading, intervention, independent review, reading centers and homework.

Aligned with Common Core Literacy Standards in grades K-3, this unit includes the following activities and worksheets:

  • Differentiated lesson plan for chunking multisyllabic words
  • Suggestions for use
  • Graphic organizers for two and three syllable words
  • Phonics worksheets for decoding two syllable words
  • Word lists for multisyllabic words with various syllable patterns
  • Flashcards and multi-sensory activity ideas
  • Chunking chipmunk poster and puppet graphic
  • Decoding and Comprehension strategy poster
  • Sentence writing worksheets with word banks and editing checklist
  • Customizable worksheets to allow for differentiation

Complete Unit Preview

Download here so you can introduce Charlie the Chunking Chipmunk to your students today!


Why? The Simple, Yet Essential Question

As teachers, we are programmed to listen for the correct answer and are appeased when we hear it, assuming that students understand and are ready to move on. However, this is a serious misconception as students are missing out on a vital opportunity to explain and justify their thinking.  Asking “Why?” provides critical insight to student understanding as students give the following responses:

  • A strong explanation that describes process to class
  • An inaccurate explanation that shows a student’s misunderstanding or inability to justify an answer

Besides assessing understanding, asking “Why?” provides students with opportunities to:

  • Notice mistake(s) and self-correct the answer
  • Reveal mistake(s) or misunderstanding shared by the class
  • Take risks and build confidence
  • Strengthen communication skills
  • Give alternate explanations
  • Summarize explanations given by other students

Including this simple question has major consequences: it promotes a language-rich classroom; supports inquiry-based instruction; and builds classroom community.

Asking good follow-up questions can open the door “why-d” to learning.

Download our FREE Essential Questions & Prompts, a sneak peek at our upcoming Common Core Problem Solving Unit.

“Owl” Always Love You!

Looking for something for “owl” of the special people in your life? These six adorable owl-themed Valentine cards can be used for students, parents, volunteers, coworkers, friends and family. FREE for a limited time only!!!! Click on the the link below and simply print off on cardstock, cut-apart and write name of recipient.

http://www.teacherspayteachers.com/Product/Owl-Themed-Valentine-Cards-541002

These cards are also great to use for lunchbox notes or love notes anytime your little ones need some extra TLC.  I put these notes in my boys’ lunches all throughout the year.original-541002-1

Turn Your Students Into Mad Scientists

Science projects are the perfect way to promote inquiry-based thinking, teach critical Common Core State Standards (CCSS) and motivate the most reluctant learners. Science projects allow students to: participate in shared research and writing projects; gather information from provided sources to answer questions; participate in collaborative conversations; and describe the connection between a series of scientific ideas or concepts.


Follow these 5 easy steps and turn your students into mad scientists:

  1. Select an engaging project that aligns with CCSS. My second grade class loves insects and they are required to study life cycles. So I created a life cycle of a painted lady butterfly unit for them.Older students can choose their projects to increase engagement and ownership.
  2. Set up a science center in the classroom. I created a large bulletin board complete with science project question, hypotheses graph, calendar to track observations and a vocabulary graphic organizer. I also selected a wide variety of nonfiction text (correlated to my students’ current reading levels) to use during reading group and read-aloud time. During observations, students go to a small circular table to observe the caterpillars and record results in their science journals. Magnifying glasses, rulers, pencils and crayons are available at this table to assist with journaling.2014-01-11 23.01.330592014-01-11 23.02.42
  3. Encourage dramatic role play. Scientists wear lab coats while working, why shouldn’t the students? I borrowed 5 white dress shirts from my dad, the perfect sized “lab coat” for my second grade students, rolled the sleeves and hung up at the science center. While students work at this center, they are allowed to wear the “lab coats” and they absolutely love it. They really focus on their work and are very precise and detailed with daily journal entries. I take pictures and use them for the interactive bulletin board (see below) and put one copy on the inside of the each student’s journal.
  4. Create an interactive bulletin board. My students had several questions about caterpillars and butterflies and were eager to learn the answers. I used these questions to make a scientific bulletin board. First I made magnifying glasses using brown construction paper handles, green paper plates (from Target) and a white construction paper magnifying glass lens. We brainstormed and recorded a list of questions together and then I partnered students to record and answer questions. One student wrote the question on the handle of the magnifying glass, the other wrote the answer on the white magnifying lens and glued inside the green plate. I added their pictures on top and displayed on a prominent bulletin board.054
  5. 2014-01-11 23.47.22055Hold a science fair. When the experiment is over, students can make personalized invitations for families (and possibly other classes) to come learn about the scientific findings. During the science fair, students can share journals and science report as well as show specimens and other related projects. I always put out refreshments (cookies and juice) to create an inviting atmosphere.

Download our CCSS science journal to start your new unit!

Your 2014 Fresh Start

These 5 easy tips are guaranteed to recharge your classroom and start your new year off on the right instructional foot.

  1. Get organized: Purchase inexpensive book boxes to store center games, house student work portfolios and hold daily work. Target has several cute prints and patterns in a wide variety of colors. Print labels for easy organization. DSC_0432 (2)Revisit rules and procedures: Students need time to get back into school routines. Review rules and behavior expectations. Practice daily procedures such as lining up, walking quietly in line and transitioning from one activity to another. Turn this procedure practice into a game by timing class, encouraging them to beat previous practice times. Check out our Routines, Procedures and Transitions Toolkit for additional ideas on how to teach, model, practice and reinforce important systems and routines.
  2. Encourage parental involvement:  During the first week of the new quarter, invite parents to help at school. This could be working with small groups, filing paperwork or prepping materials at school (or home). Work schedules often change after the holidays which can lead to new opportunities for parental involvement. Grandparents (and other relatives) often love helping in the classroom as well.
  3. Planning ahead: Instead of waiting until Sunday afternoon to plan lessons for the week, use a planning template to create an overview of upcoming units, standards and activities. The template should serve as a working document, easily modified to accommodate instructional needs that might arise. This will save you endless hours of last minute preparation and put an end to stressful Sundays.
  4. Work-life balance: Teaching can be all-consuming. Be mindful of your work-life balance. Schedule daily down-time into your calendar. This could be as simple as a bubble bath or 30 minutes of leisurely reading. Relaxation is critical and makes you a much happier, productive teacher.


Thankful Thoughts: FREE Thanksgiving Turkey Writing

Check out this fun and easy to use Thanksgiving craft and writing activity. Includes original Astute Hoot colored turkey body and feathers for craft, blackline master of turkey graphic, suggestions for use including Thanksgiving books for read aloud, and Thanksgiving themed journal writing paper. Great for grades Pre-K through grade 3.

http://www.teacherspayteachers.com/Product/FREE-Thankful-Turkey-Thanksgiving-Writing-Activity-971628


Shopping for Standards: Setting Up a Classroom Shop


Looking for a fun, easy way to strengthen students’ money skills? Set up a classroom market! This guaranteed favorite can be used throughout the year and modified according to instructional needs. Follow these easy steps to create your own classroom market:

1.Setting up shop: Visit your local dollar store for grocery baskets, cashier receipt pads, calculators and price labels. (Make sure each student in the center has a grocery basket so each has opportunity to shop.) Make a store awning using a cardboard science project trifold and cover it in fabric. A simple, inexpensive cash register can be found on e-Bay or local thrift shops.

030

 2. Providing products: Bring in canned products, purchase plastic play food or pull out Treasure Box trinkets. My market is   holiday-based to appeal to student interest so it changes regularly. Students can shop for Thanksgiving dinner, holiday gifts, school supplies, etc. Changing the product once a month promotes engagement as students are excited to see and purchase new items.

032

3. Pricing power: Price items according to students’ instructional needs. If you just introduced money, keep prices low and easy to count. This provides counting practice and builds number sense. As students become proficient counters, increase the prices and have students add more complex numbers. You can also add dollars and cents to increase difficulty.

4. Hiring help: For the first month or two, the teacher or parent volunteer will be the cashier, checking students’ totals and helping them make change. As students become proficient with these skills, allow students to be the cashiers. Students can partner up; one student will be the cashier, one will be the shopper and then they will switch roles. Another option is to allow one or two students can be the cashier(s) for the whole group.

5. Synthesizing standards: Add functional text forms to incorporate reading and writing standards into the market. Simple items such as shopping lists, receipts and inventory check-lists require students to read and write a variety of functional text, an important component of informational text.

455

Set up a shop in your classroom and you’re in store for endless instructional possibilities!

033

Wise Tool of the Week: The Target Dollar Section

Like most teachers, I love to decorate my classroom for the holidays, a costly endeavor until I found the Target Dollar Section. Clearly geared towards teachers, the Target Dollar Section provides a wide variety of holiday-based classroom materials. On my last trip, I found the following:
Halloween classroom decor: Small rugs, window clings, spider webbing, hats, faux leaves and containers

Party supplies: Bingo, paper plates, plastic ware,cups, confetti, tablecloths, treat bags

Treasure Box items: reward charts, stickers, pencils, erasers, rings and other small trinkets

Plus the pricing is perfect; everything is $4 and under! This makes holiday decorating feasible and fun!


Going Batty!

Halloween is just around the corner and kids are focused on costumes, candy and creepy creatures–it’s enough to make you batty! Use this “Stellaluna” and Nonfiction Bat Unit to engage all learners while teaching critical Common Core Reading, Writing and Science standards. In this unit, students will:
–Retell “Stellaluna”
–Compare and contrast characters
–Identify cause and effect
–Make text connections
–Pair fiction/nonfiction books (twin texts) to increase comprehension and build nonfiction reading skills
–Identify and use text features to locate important information
–Ask and answer questions using text
–Participate in shared bat research
–Plan, draft, edit and publish bat report on enlarged bat (teachers can hang from ceilings)

Supplemental homework and cooking activities are included as well.
A literature list and directions for making a classroom “Bat Cave” for classroom are also provided.
***Common Core Standards are listed next to each activity.

Download the Stellaluna & Bat Unit here.

Top 12 Active Engagement Strategies

Use these tried and true active engagement strategies to strengthen motivation, increase achievement and infuse fun into any classroom:

1. Think-Pair-Share: Students partner up and take 1-2 minutes to think silently about an answer to a specific question. At the teacher’s signal, each student faces his/her partner and discuss questions together. At the signal, students share responses discussed.

2. Quick Write: Students use white boards to write a specific response for an allotted amount of time. This can be used to activate prior knowledge, provide reflection or make connections.

3. 5-10 Word Summary: In 10 words or less, students summarize key details of the lesson or specific text.

4. Ticket Out Door: Write down 1 or 2 ideas learned from the lesson on a Post-It and how it will be used in other activities.

5. Partner Teach: Students pick partners; partners take turns teaching each other 2 most important items learned from the lesson.

6. Spectrum: Place a line of masking tape on the floor. Label one end “Strongly Agree” and the other end “Strongly Disagree.” Students line up according to their opinion of the topic. Students could also write their name on a small Post-It and place accordingly on the masking tape strip.

7. Four Corners: The teacher posts questions, photos, etc. in the four corners of the room. The teacher assigns each student to a corner. Once in the assigned corner, students discuss the question or photo in the corner. Students rotate through each of the four corners, repeating the process.

8. Jigsaw: Students read different passages from the same text or selections from several texts. After reading the passage, they take on the role of an “expert” with the passage. The “experts” share the information from their specific reading with a designated group or the entire class.

9. Get One, Give One: Students write their names on the top of a piece of paper and list 3 to 5 ideas about the assigned topic. Each student will draw a line after his/her last idea to separate ideas from other classmates. Discuss responses together.

10. Talking Chips: The teacher will pose a question for the students to discuss. Each student is given a “chip.” Each student takes turns “talking” by placing his/her chip into the center of the table. The first person to talk may only talk at that time and may not speak again until all the group members have placed their “chip” in the middle. Repeat the process with the rest of the group members.

11. Fishbowl: This strategy allows students to engage in a formal discussion and experience roles both as a participant and active listener. Students must also support their opinions and responses using specific evidence from the text. Students will be placed in two circles: 1. Inner circle students will model appropriate discussion techniques. 2. Outer circle students will listen, respond and evaluate.

12. Charades: Students can act out specific vocabulary or characters from read-alouds (i.e. “gnaw” students can pretend to chew).

Download our FREE Top 10 Tools for Back to School unit and our Back to School Toolbox: Routines, Procedures, and Transitions for additional active engagement strategies and much more!

Jessica_blog_signature-SMALL


Wise Tool of the Week: Table Skirt Storage

I am an organized person, yet when I became a teacher, I instantly became a hoarder. I signed my contract and suddenly I was collecting everything from baby food jars to milk carton lids for a variety of classroom needs. After a few years of collection and a growing number of ‘teaching cabinets’ at home, I knew I needed a new storage solution.

One day while rearranging classroom furniture, I realized that tables are an ideal storage option. They can accommodate large plastic containers for backpacks, playground equipment, and props and still have room to store file boxes and other organizational pieces. Table storage is extremely practical, but extremely unsightly. No one wants to see these items or they would be sitting out in the classroom.  After researching ways to conceal the storage, I discovered table skirts at Party City. These inexpensive plastic skirts come in a range of colors to compliment a variety of classroom decor and the self-adhesive strip makes application a breeze. Simply measure perimeter of table and cut skirt accordingly. Peel adhesive strip and stick on table ledge. Voila! Storage in a snap.

005

8 Magical Tips for Creating Word Wizards

“There is a real magic in enthusiasm. It spells the difference between mediocrity and accomplishment.”

–Harry S Truman

After being approached to teach the Spalding Method, I felt trepidation. While very impressed with the program’s research and philosophy, I was worried that my second-grade students would quickly become disengaged with the program’s repetition. I knew that I would need to spark enthusiasm and engagement or my instruction would be mediocre at best. Here are my “magic” tips for creating a successful, engaging phonics instruction block:

  1. Create a consistent schedule. Right after announcements and calendar, we complete oral and written phonogram review, followed by spelling dictation.  I selected this time because students are focused in the morning and it allows tardy students to make it to class without missing valuable instruction. Plus, it is a protected instructional time (i.e., no assemblies planned during this time). Since the schedule is consistent and predictable, students know what to expect and they become comfortable and secure with the consistency.
  2. Develop an instructional routine. Our Spalding phonics block involves 4 components: oral phonogram review, written phonogram review, guided spelling practice (see below) and spelling dictation (into spelling notebooks).  Establishing these procedures and practicing daily reinforces learned skills and promotes mastery. This repetition is critical for all learners, especially those with learning disabilities. Plus all students thrive on a consistent routine.
  3. Design practice forms and make copies for the year. Each phonics program requires some type of pencil/paper practice. Design (or modify) these forms and copy them for the entire year.  This saves hours of planning and prep time; using the same form is also beneficial for students.
  4. Give phonics instruction a special name. Phonics instruction is a valuable time, why not give it a specific meaningful name? Word Wizards is the name of our phonics block; I selected this name because students have a book of “spells” (a spelling notebook) and they learn specific rules to help them become spelling wizards.  It’s much more relevant and engaging than using the name of the program.
  5. Use props. A wizard wears a pointy hat and carries a magical wand so it’s only appropriate to include these during instruction. I purchased both props at Party City and glued foam phonograms on both. I wear the hat during instruction time (I find it keeps kids focused on me) and I use the wand as a pointer to point to specific words, phonograms or rules.

8516. Include active engagement. Every student loves white board practice, so why not customize for phonics instruction? Our class uses Sally Sounding Out Snake to help segment and blend one syllable words and Charlie Chunking Chipmunk to break apart multi-syllabic words. Create these double-sided boards and laminate them for daily practice. Read each animal’s accompanying poem to teach/review strategy and then use as a guided practice tool, just like a white board.

0317. Provide positive reinforcement. Be sure to provide plenty of praise and call students up to share their work. I select one Word Wizard each day; this is a student who demonstrated “magical” active participation, listening skills, attention to handwriting focus or other desired behaviors. The Word Wizard is selected at the end of the phonics block and given a special Word Wizard award. I reiterate reason(s) why the student was selected and show his/her work when appropriate. While it might seem like simple reward to us, students view it as a major accomplishment and cherish these colorful awards

8.Have fun! No matter how you plan your phonics instruction, be sure to have fun! Students need consistent daily instruction with opportunities for kinesthetic practice. Include these tips and you will soon see the magic!

Check out our Word Wizards Spalding & Phonics Support Kit at www.teacherspayteachers.com.

Wise Tool of the Week: Table Skirt Curtains

Looking for a quick, easy way to create cute window treatments? Table skirts are your answer! Sold at Party City for $8 each, these plastic table skirts come in a variety of shades to compliment a wide range of classroom decor. Application takes less than 5 minutes:

1. Cut length of skirt to fit your window.

2. Peel backing and apply adhesive strip to top of window.

3. Fold table skirt under and glue (or staple) to top of window, creating a billowed, valance effect.

4. One table skirt covers two large windows (see picture).

These adorable curtains have an added bonus–they are also durable and easy to clean (they only need light dusting every few months). What more could a wise teacher ask for?

005

Sign up for
blog updates

© 2020 – Astute Hoot. All rights reserved.